So you dug up your garlic, cured it, and realized you have so much fresh garlic you cannot possibly use it before it all starts to sprout. Yup, been there. Done that.
This conundrum is particularly problematic with the hardneck varieties that I prefer to grow. While hardneck’s have a more attractive form factor and (I think) a better flavor profile, they are not known for their cured-storage longevity. I grow Music – a particularly long-storing hardneck – which helps, but still find myself needing to diversify my garlic preservation.
Luckily, garlic is adaptable. You can dry it, freeze it, pickle it or ferment it. You’d expect such flexibility from a survivor vegetable originally from the high, cold steppes of central Asia, wouldn’t you?

Today, let’s focus on freezing this wonderfully pungent bulb. Here’s what you need to know:
Freezing Garlic
You can freeze garlic as:
- Whole, peeled raw cloves
- Roasted garlic cloves
- Chopped raw garlic in oil
- Raw garlic paste
- Roasted garlic paste
Frozen garlic is ideal to use in situations where the garlic texture is not critical. The taste of frozen garlic is not dramatically different from fresh, but the texture does change. Garlic that has been frozen will have a softer, mushier texture than fresh garlic.
Use frozen garlic in:
- Pasta sauces
- Braises (40 clove chicken, anyone?)
- Creamy salad dressings, such as Ceasar
- Soups
- Smooth dips, such as hummus
I prefer to freeze my garlic chopped, in olive oil. Typically, situations where I’d be using chopped garlic – such as a base for a sauce, soup or saute – benefit from oil, anyway. I also find that chopped garlic “loses less” texturally than whole cloves when frozen.
Frozen Garlic In Oil, Step-by-Step

Peel Your Garlic Cloves
There are several so-called tricks to peeling large quantities of garlic – the bowl shake, the closely related jar shake, and that darling of late-night infomercials, the tube roll.
Let me be clear: these tricks don’t work well with truly fresh garlic. Go ahead and try if you must, but know that fresh garlic does not jettison it’s skin as thoughtlessly as the months-old stuff from the store featured in these videos.
It’s a lot like those tricks to peeling hard boiled eggs. They mean very little when your eggs are fresh out’da butt of your friendly backyard chicken. But I digress.
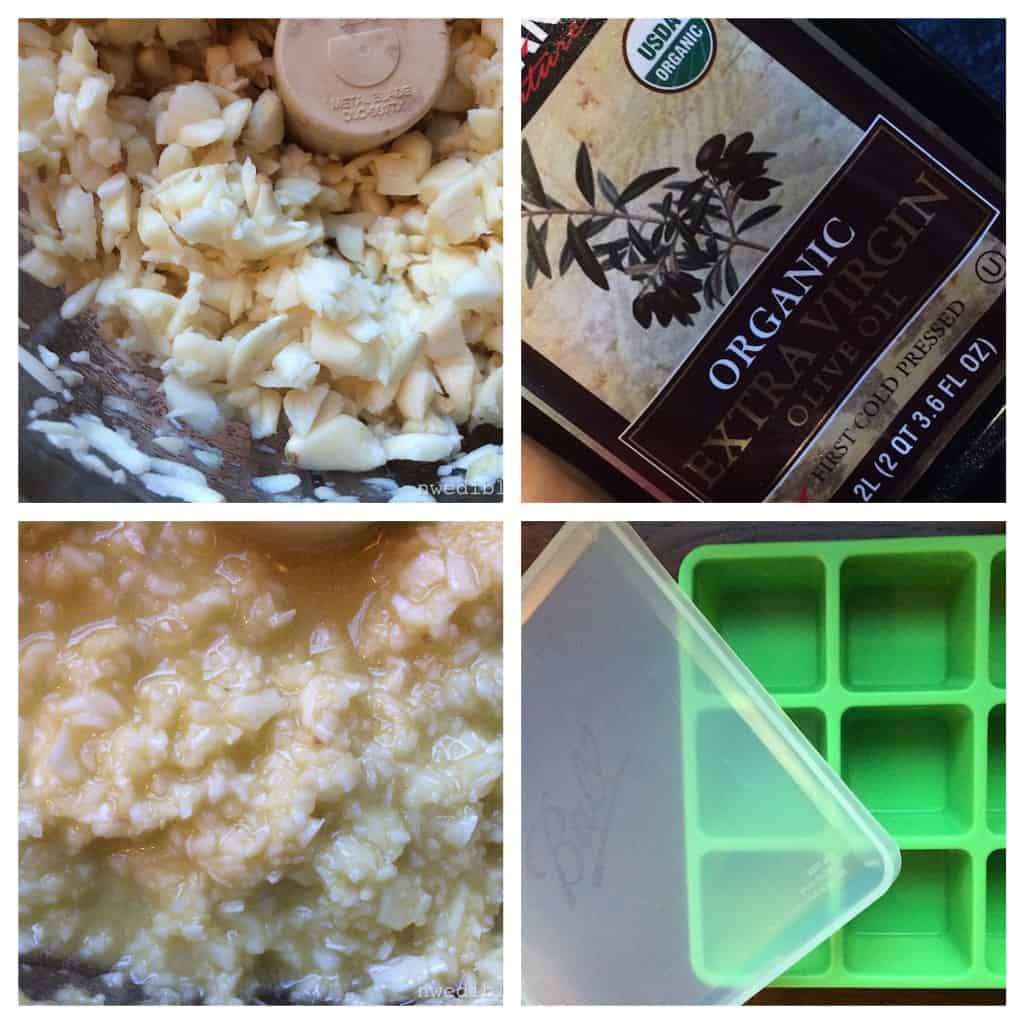
Chop Your Garlic
I break out the food processor for this, and recommend you do to. For smaller quantities, I’ll use the chopper attachment of my stick blender.
If you prefer, you can, of course, chop your garlic the old fashioned way, with a sharp knife and long patience.
Add Olive Oil
I typically only keep one liquid oil on hand – olive oil – so that’s what I use. If you prefer another type of oil, like canola or whatnot – that’s fine.
Add enough oil that the garlic pieces are fully coated in the oil, but not so much that the garlic pieces begin to sink to the bottom of the oil. I’d estimate that I use about a one-to-one ratio of garlic-to-olive-oil by volume. It’s totally ok to eyeball this.

Find A Suitable Container
I used these [easyazon_link identifier=”B00GY8WZFU” locale=”US” tag=”nortediblife-20″]Ball Herb Freezer Tray[/easyazon_link] things, and I gotta say, they’re awesome for this kind of thing.
But, you can use standard ice cube trays, silicone baking molds, or old (thoroughly washed and dried) plastic egg cartons. You can even use a parchment-lined baking dish if you are willing to hack the resultant rectangle of garlic into more bite-size chunks.
Freeze Those Cubes
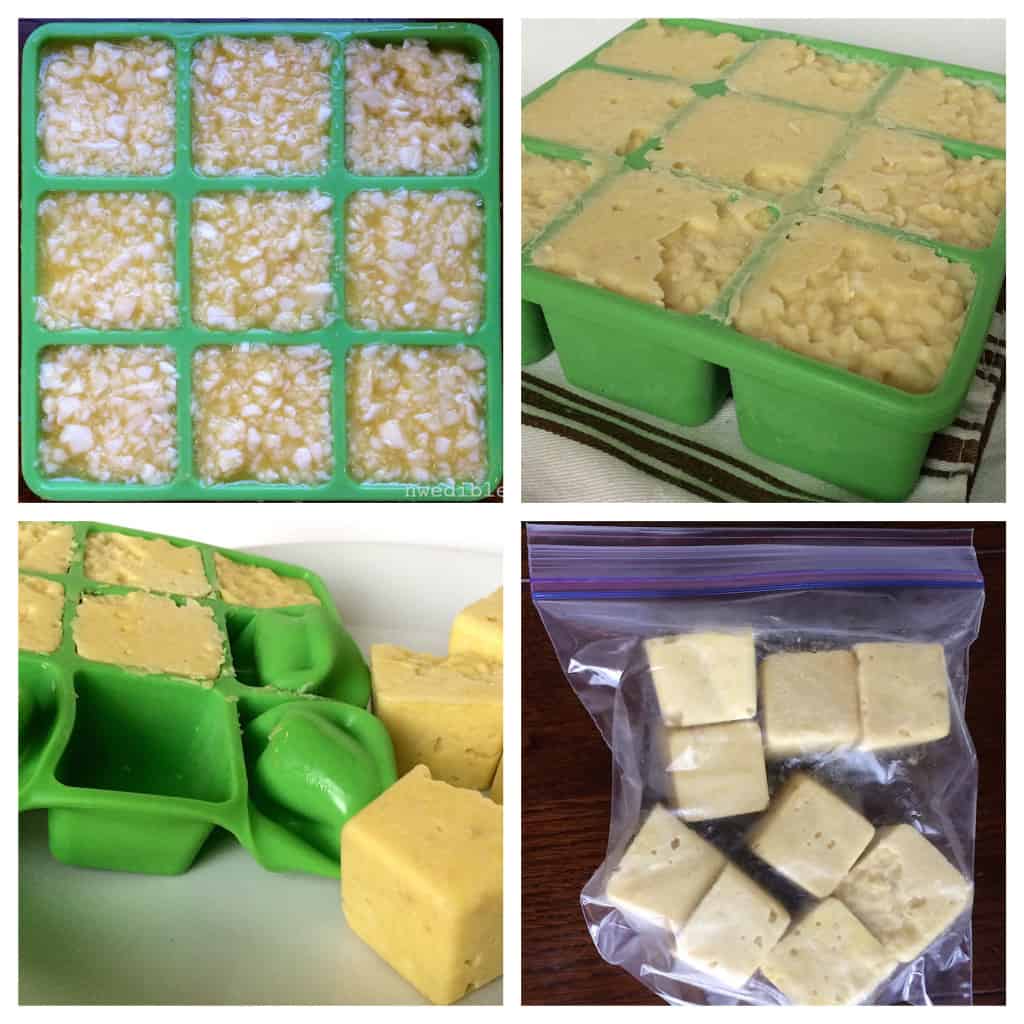
Fill your container of choice with the garlic-oil mixture. Make sure you seal your container tightly. If your container doesn’t come with a tight-fitting lid, wrap the container with plastic wrap. If you don’t lid that garlic up, everything in your fridge and freezer will turn vaguely garlicky.
I will not be held responsible for garlic-suffused Chunky Monkey.
Transfer To A Freezer Bag For Long Term Storage
When the garlic cubes are fully frozen, pop them out of the freezer tray and transfer them to a heavy duty freezer bag or a wide mouthed, freezer safe jar for long term storage.
Silicone trays, like these Ball herb trays, make it easy to pop the individual cubes out, but they aren’t necessary.
Garlic in oil cubes like these will last in the freezer for 6 to 12 months, easy – long enough to bridge the gap between one year’s fresh garlic harvest and the next.
Safety First!
This is a tutorial for freezing garlic in oil. There’s a reason for that. Items that are grown in contact with dirt (like garlic) are excellent hosts for C. botulinum spores. By surrounding the garlic with oil, we create a low acid, oxygen free environment.
When C. botulinum spores find themselves in a low acid, moderate temperature, oxygen free environment, they happily “reanimate” into the active form that can cause the botulism toxin.
So, garlic in olive oil is a botulism risk. Botulism is no freaking joke, and several botulism outbreaks have been linked to garlic infused oils left at room temperature. (Source)
Do yourself and your ability to breathe a favor, ok? Keep this stuff frozen until you are ready to use it, and don’t leave it sitting out at room temperature for hours on end. A frozen cube of minced garlic in oil thaws rapidly, or you can take a cube directly from freezer to saute pan.
“But what about refrigeration!?” you ask? An excellent questions! Here’re the facts:
There is at least one known strain of botulism toxin* (Type E, thanks for asking) that can grow in normal fridge temps as low as 38ºF. Not really surprisingly, this strain is found primarily in sediment of oceans and lakes (they’re cold!), and the highest risk foods for contamination by this strain are seafoods. (Source)
The strains of botulism toxin more associated with soil-borne spores – Types A and B – require a temperature of 50-122ºF for optimum growth. (Source)
Safety guidelines for fresh, non-acidified garlic-in-oil preparations allow for such products to be stored at refrigerator temperatures of 40ºF or below for 2-3 days. (Source)
This is all very interesting from a theoretical perspective if you are a food safety nerd like me, but what does it mean?!
It means, to be absolutely safe you should keep your garlic-in-olive-oil mixtures frozen until use. I don’t want anyone to run around panicking here; you will not get botulism by allowing these oil cubes to sit out for ten minutes to thaw. But, don’t be foolhearty, either. If you leave a garlic-in-oil preparation at room temperature for more than 2 hours, discard it.
32
Hi Erica,
Would this also apply to garlic scape pesto, which I have frozen in small cubes. If this is used in a cracker dip or spread and left out for a while would it be safe? Thanks.
Yes, as long as your product is not left at room temp for more than 2 hours, there’s no reason to worry. If you need to leave it out longer than that, you can put it in a bowl and then set that bowl on ice. This will help keep the dip chilled and prevent the growth of bacteria that could lead to foodborne illness.
Great post! I will hopefully have too much garlic due to the fact that the garlic I buy starts to sprout so I shove it in the ground. I want to avoid the endless cycle of sprout/shove/grow etc etc.
The botulism deal was the thing preventing me from freezing garlic. My sister is always saying I’m going to get botulism from freezing garlic and I didn’t know why she thought that. This is a wonderful and helpful post! I do have too much garlic (well, if my neighbors back off on their usage of it, hehe) and now will freeze it. I love garlic. No vampires here. Put it into every recipe.
There’s a lot of fear about botulism that I think stems from just not understanding what it is and how it grows. No one seems to panic about eating chicken, for example, but it’s estimated that each year salmonella – found on almost all poultry – causes one million illnesses in the United States, with 19,000 hospitalizations and 380 deaths. In contrast, there average about 20 cases of foodborne botulism poisoning a year, and the death rate with medical care is about 5%, so about 1 person a year. (All statistics from the CDC, feel free to confirm here and here.)
None of this is to suggest that we shouldn’t take all precautions in ensuring our home-canned, home-preserved and home-cooked food is prepared and stored in a safe manner. We know how to prevent botulism in canned foods; shortcutting is never ok. But botulism generates this sort of knee-jerk panic fear in folks that I think does stop many people from doing more for themselves, and it needn’t. The research tells us exactly what it takes for the botulism toxin to grow and develop – and how to avoid these conditions.
My take. 😀
One way I learned not to be so concerned about ‘germs’ on meat and poultry was to marinate the meat in a vinegar-water-salt solution – kinda like kashering but not really. I refrigerate it while it is marinating and turn the meat every so often. When I am ready for it, I drain it, maybe pat it dry with paper towels and then braise and cook it. I’m 71 and no problems so far. As for canning – make absolutely sure the food to be canned is cleaned well, as is all canning materials. I set the lids in hot water, boil the jars and take them out to drain a bit as needed. I found a missed rack of tomato sauce canned over 6 years ago and not one lid is poofed. I was advised it was probably OK to eat but better to dispose of it. I’m more concerned with the spout blowing and having to clean the ceiling than botulism as I follow the Ball canning book recipes as well as advice from the Home Economist.
Great post Erica! Now I know what to do with that garlic so I can enjoy it later in the season, and this way its all ready to go in the pan. I love the idea of doing a large batch and then having those little blocks ready to go for speeding up my dinner prep!
Barb
It’s so convenient this way! I think you’ll like em too, Barb!
I have some silicone square ice cube trays that look identical to the Ball herb thing, but it has twice as many…holes? space for freezing things? It’s lovely.
One note on the type of oil–I had a TON of chopped chives that I put in those trays, used the last of my olive oil on half and canola oil on the other half. The canola ones never froze solid so I ended up having to scoop them all out of their tray into a baggy and freezing them that way.
Thank you so much for that canola oil tip! I’ll be honest – it never occurred to me that other oils would freeze differently from Olive, but thinking about it, of course that makes sense. I am not a fan of canola oil for a whole host of reasons so I don’t stock it, so I’m so glad you chimed in about this.
Very timely article, Erica. I’m hoping to hold off processing my garlic until it is planting time in a few weeks. The friend who got me started growing garlic years ago taught me to chop it in a blender with water and freeze it in small portions that way. Being a lazy soul (and not ecologically correct) I portion mine into sample-size cups-2 oz and 4 oz- with lids and then place those in zip bags. When I’m really scrambled for time I just pop one of those cups in the microwave on low power to thaw. (Oh, her method for peeling is to dampen a terry kitchen towel then place a few handfuls of cloves in the middle, gather up the edges and massage it and roll it on the counter a few times then remove the clean cloves. And repeat and repeat.) I’ll definitely try freezing some in oil this year, thank you!
Erica -Thank you for this very informative post.
Perhaps you can help me. My beautiful garlic has developed a black Asparagus mold of some type for the first time. The mold is still dry and dusty.; most of the cloves are still firm. Can I peel and freeze this garlic safely?
Second question – how do I prevent this mold from developing in my next planting?
Maybe it was the extra watering that I did due to the extreme heat and drought this year?
My garden is in the coastal Pacific North West.
Thanks you
Different people will have different feelings about the relative risk of A. niger growing on alliums. I can tell you what I would do in your situation. I would wash the garlic in hot water, with a teeny bit of soap in the water to get as many of the spores off as possible. Then I’d dip the whole heads of garlic in a dilute bleach solution. Some people will NOT want to do this – that’s fine, it’s just how I’d handle this situation. I’d let the garlic dry on a towel for about 20 minutes, then I’d peel it into separate cloves. If there was substantial fungus under the top wrapper leaves, I might repeat the process as needed.
Then I’d proceed with either freezing or drying the garlic. I would not use this garlic in a canned situation, even as a component in something like a salsa.
A. niger is in nearly all soils, but becomes more common when warm and moist come together – so honestly I’m not surprised this past year it flared up for you a bit. Try not to water garlic during leaf die-down. Here’s some more info from OSU.
Hope this helps.