
At the risk of oversharing someone else’s podiatry problems, by husband has some janked up heels. They’re super dry and they get these deep cracks in them, especially in winter. (Sorry, sweetie.)
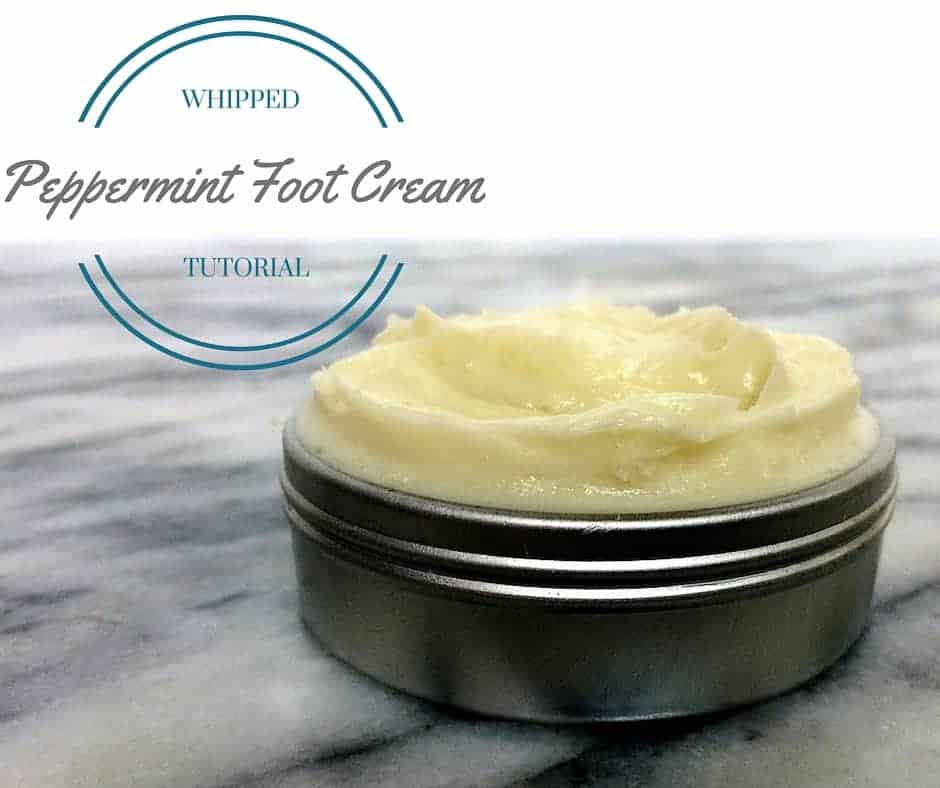
This Whipped Peppermint Foot Cream was developed for super dry feet like my husband’s. The addition of peppermint essential oil gives the cream a nice cooling vibe, while tea tree brings a little antifungal power to the party. You can use this basic formula as a hand and body butter as well, just modify the essential oil blend to suit more delicate areas of the body.
Here’s how to make it.
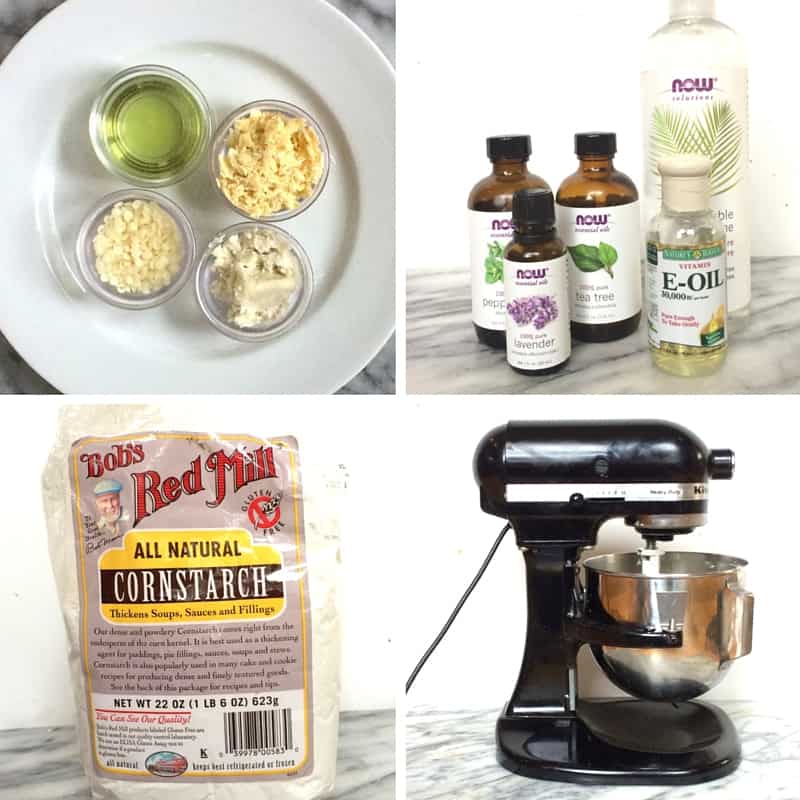
You will need a liquid oil (I used grapeseed oil, but avocado or olive oil would be fine as well), shea butter, cocoa butter and beeswax for the basic balm. In addition, I recommend Vitamin E oil and vegetable glycerin for additional healing and emollient qualities, and essential oils.
To successfully whip the cream to achieve the right texture, you’ll also need cornstarch and a stand mixer or heavy duty hand mixer.
See below for resource links to all the exact products I use.
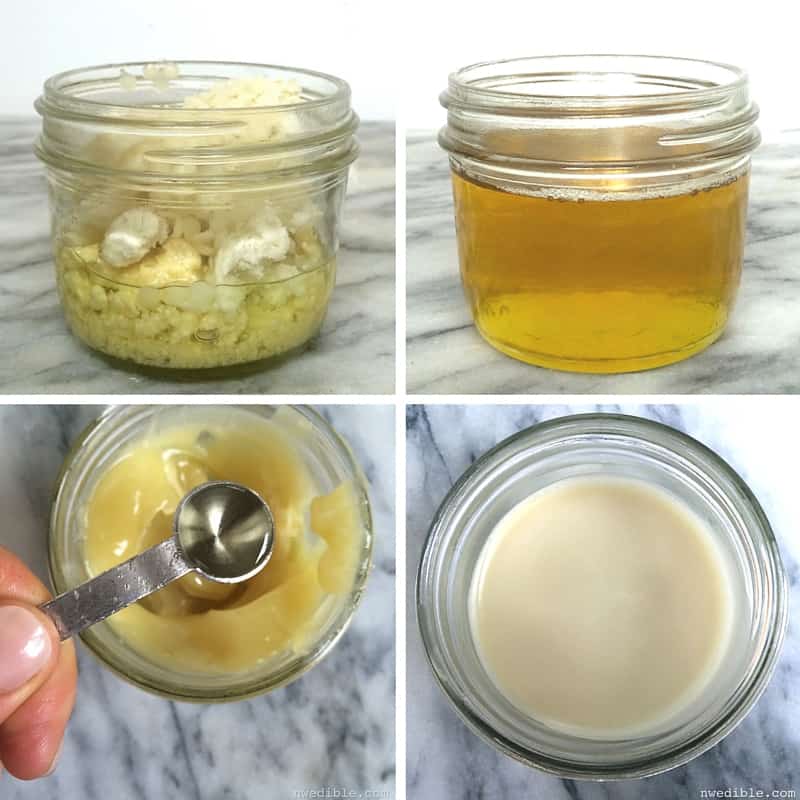
Making the basic balm is easy-peasy. You just melt together the oil, shea butter, cocoa butter and beeswax. Allow that mix to cool until it just starts to firm up, then stir in the Vitamin E oil, vegetable glycerin, and essential oils.
Now you’ve got a basic super hydrating balm. Allow it to cool completely.
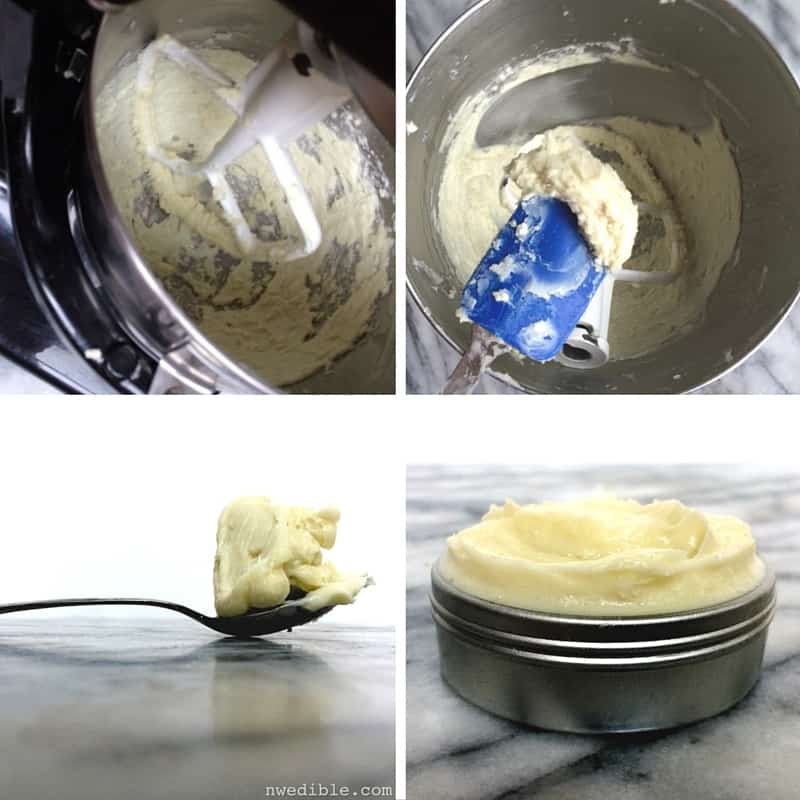
You can use the balm as is, but I far prefer the texture when the cream is whipped. To whip the cream, scrape all the cooled balm into the bowl of your stand mixer and fit the paddle attachment. Turn the mixer on to break up the cream, then pause your mixer and sprinkle a teaspoon of cornstarch over the balm.
Work the cornstarch into the cream on low speed so it doesn’t fly all over your kitchen, and when you can’t see any bits of cornstarch, ramp the mixer onto high. Beat the cream for a good 3 or 4 minutes, until it’s light and fluffy, with a texture very similar to buttercream frosting.
At the right texture, the cream will mound up high on a spoon or spatula.
Store the cream in a tin or small mason jar.
To use, just rub a small amount of the cream on your feet and rub in until your feet no longer feel greasy. For maximum moisture, add a thicker layer at night before bed. Rub the cream into your feet, but allow a thin coating to remain on particularly dry areas like heels. Put on socks and let your feet soften absorb the extra cream overnight.
Printable Whipped Foot Cream Recipe

DIY Super Moisture Whipped Peppermint Foot Cream
Ingredients
- 15 grams beeswax, pastilles or finely chopped bar
- 30 grams shea butter
- 30 grams cocoa butter (see note)
- 60 grams grapeseed oil (see note)
- 20 grams vegetable glycerin (optional, but nice)
- 1/4 tsp Vitamin E oil (optional, but nice)
- 15 drops peppermint essential oil
- 10 drops tea tree essential oil
- 10 drops lavender essential oil
- 1 tsp cornstarch
Instructions
- In a pyrex measuring cup or wide-mouth mason jar, carefully measure the beeswax, cocoa butter, shea butter and grapeseed oil.
- Microwave these oils on medium power. Alternately, add the pyrex cup to a shallow pot of water and bring the water to a simmer. Heat the oils until the beeswax is fully melted.
- Allow the oil mixture to cool just until it begins to solidify, then stir in the glycerin, Vitamin E oil and essential oils.
- Allow the cream to cool completely at room temperature.
- Using a spatula, transfer the cream to the bowl of a stand mixer fitted with the paddle attachment. Turn the stand mixer on to medium speed, to break up and begin to whip the cream.
- After about 30 seconds, or when the mixture is beginning to look more pale and creamy, turn the mixer off and sprinkle the cornstarch evenly over the cream.
- Turn the mixer back on to low speed, just to incorporate the cornstarch. After the cornstarch seems mixed into the cream, turn the mixer to high speed and whip the cream until light, fluffy, and opaque - the cream should look much like whipped frosting.
- When the cream is whipped, transfer it to tins or small mason jars.
- Kept at cool room temperature in an airtight container, the cream should last at least 6 months, though the essential oil scent may fade with time. Keep away from excessive heat and direct sunlight, which can cause oils to turn rancid prematurely and may melt the cream, causing it to separate.
Notes
An additional 30 grams shea butter can be substituted for the cocoa butter if you prefer not to keep both butters on hand. If using all shea butter, you will use a total of 60 grams shea and no cocoa butter. All other measurements remain the same.The essential oils are optional. Substitute other skin-friendly essential oils as you like.Other liquid-at-room-temperature oils like sweet almond oil, avocado oil or olive oil can be substituted for the grapeseed oil if you have a distinct preference. The final texture or scent of the cream may change slightly with alternate oils.
Resources to Make Whipped Foot Cream
Here are the products I use to make this recipe. I order most of this stuff on Amazon. If you prefer to avoid The Big A, you should be able to find many of these products at larger health food or natural living stores as well. The links below are affiliate links, so if you get all inspired to try this foot cream, consider buying your kit through my links – it helps keep the site alive!
Beeswax pastilles
Shea butter
Cocoa butter
Grapeseed oil
Vegetable glycerin
Vitamin E oil
Peppermint essential oil
Tea tree essential oil
Lavender essential oil
Cornstarch
The kitchen scale I use
Wide mouth half-pint mason jars
Kitchenaid stand mixer
Why Hello, Pinteresting People
Wanna save this for later? Just pin the image below to your natural body care, beauty, skincare or DIY board.

so what oils would you recommend for a body or hand cream then?
It really depends on your skin type and your fragrance preferences. For an all purpose body butter, I’d recommend a base of lavender, with a bit of maybe rosemary and chamomile.
This massage practitioner approves this message!
Ok. This is great. I’m making this for my husband. I won’t get into his foot problems because it’s vulgar, but I’m glad I know about this and its anti fungal properties. I cannot wait for him to try this! Right now, he uses Vicks Vapor rub on his feet constantly so there’s never any left when we get sick! The porker. And you used ingredients that I know I can get hold of right down to the brand. Cool.
This recipe sounds great. I never imagined I could get the whipped texture in a homemade cream so easily. Makes it that much more decadent. Thank you for figuring it out. The affiliate links for the beeswax and the Shea butter might be a little janky; the other links work fine!
It took me, let’s just say…awhile…to figure out that a little bit of cornstarch totally changes the whipped texture. Hope you like this as much as I do! Thank you for letting me know about the links; I think I have them fixed now.
Very timely post! I think all our feet could benefit from a little TLC this time of year. I need to assemble the ingredients and whip up a batch myself! Lisa
This recipe looks great! Just be sure to put a big “FOR FEET ONLY” label on it, to ensure no confused husbands end up mistaking it for cream cheese icing… 😉
Need to make this for The Husband. His heels are sharp. Have been begging him for years to go get a proper pedicure. Pretty sure they’d need to use a power belt sander.
My husband uses “Working Feet” lotion that we have been buying at the store and is very expensive. I made a batch of this recipe and will never buy lotion again for his feet. So easy and I know just what it contains! Thank you!!!! I will say I saved the old containers from the purchased lotion and filled it with the home made, no one will know the difference…..
How do you clean your mixer? Do you keep a separate bowl and mixer attachment for beeswax formulas?
Thank you! I am going to make this for my close friends and family this Christmas. Jackie
My question is DO YOU SELL your peppermint foot cream & is so how much is it & could I have your
phone # ??????
THANKING YOU,
KINDLY,
Lorraine
Hey very nice blog!! Guy .. Excellent .. Wonderful ..
I’ll bookmark your blog and take the feeds also?
I’m happy to search out so many useful info here in the submit, we need
develop extra techniques in this regard, thanks
for sharing. . . . . .
Never microwave the oils!! It removes important properties from the oils/butters!! Use a makeshift double boiler, I have a glass jar that I put what needs to be melted in inside a pot of simmering water 🙂
About how much does this recipe make? Would love to try this for Christmas gifts but not sure how to plan packaging/multiplying recipe. Thanks!
Can I use sweet almond oil instead of the grapeseed oil?