We’ve all been there, out of room and eager to expand the garden. That sod starts to look like the enemy and eventually the only question is, do you smother the grass with whatever you can find, or do you buy ready-to-go soil and get your seedlings in the ground asap?
Build vs. Buy, a classic garden soil dilemma. I’ve opted for both methods, and both have their advantages and disadvantages.
Build Your Soil
Building your soil means taking what you have or can get locally – your native dirt, kitchen trimmings, non-toxic sawdust, appropriate animal waste, sand, bark, yard waste and the like – combining it appropriately, and giving it enough time to break down into something your plants will be happy to grow in. I’ve done this.
“Oh, wait!” I can hear you say, “you mean composting!”
Well, yeah, basically. I “build” soil the same way I make slow, half-ass compost, I just don’t aim for quite as rich a finished product.
Most of my soil building has happened as a happy side-effect of smothering lawn.
I spent much of this past week smothering (more) grass with cardboard and burlap and woodchips. I’ve done this particular smother-dance so many times that I know what’s going to happen.
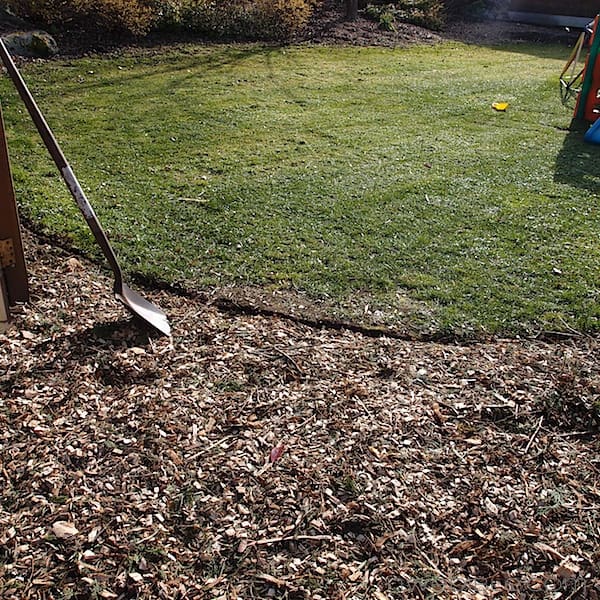
For the first week or so, everything will be puffy. Then a few good rains will saturate the cardboard and help the woodchips knit together into a more solid mulch.
After about a month, the cardboard will start to break down. Beetles and worms will come from wherever they live to chomp down on the decaying cardboard. Yum, carbon buffet!
After several months, scraping away the top layer of chips will reveal white threads of mycelium woven throughout the strata of the woodchips. The cardboard will still be recognizable, but it will be soft and tattered. The grass underneath will be dead. A whole world of teeny life will now call the mulch home. Worms will party like it’s 1999. Millipedes will curl into tight little armored C’s when disturbed. Sow bugs and little grey slugs and yet more beetles will find a habitat well suited to their needs.
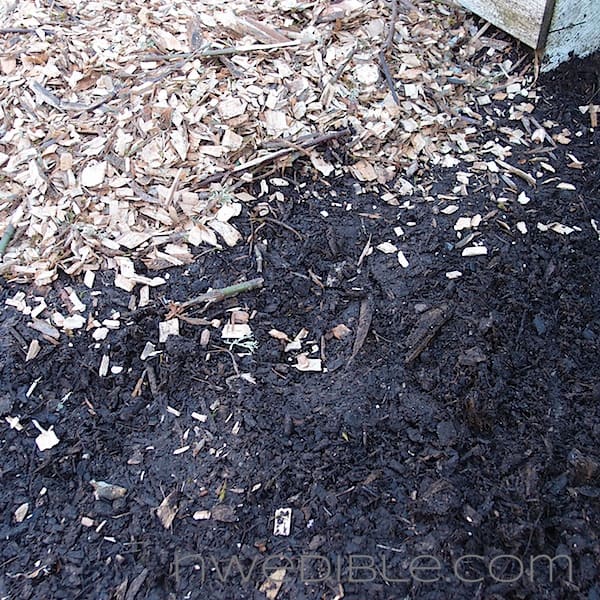
Depending on the time of year, within about six or twelve months mushrooms will start popping up out of the chips. There will be great strange flushes of mushrooms that will take over whole sections of the mulch in what seems like a few hours. I’ll walk through kicking them over and smashing them into the chips because, though I recognize the critical importance of fungi in soil building, I remain in constant terror of my preschooler popping a few unidentified and possibly toxic mushrooms into his mouth when I have my eyes elsewhere.
A bit more time – another nine or twelve months (best to just ignore this process entirely if you are an impatient person) and only the top layer of woodchips will still look like woodchips. The lower layers will be a rich, dark soil dotted with the occasional bit of un-broken-down wood. There will still be striations in the soil – the area that was sod may be distinguishable as a particularly dark layer of soil. The cardboard layer may remain for a while longer as a tan line – almost a goo.
This is DIY Soil. Start to finish, good soil building this way takes a year or two in my climate. Hands on time is however long it takes to spread cardboard and woodchips and any other compostables you might want to add, and then nature just takes its course. This is a set-it-and-forget-it technique.
Advantages
- Control over components of your soil mix
- Recycles waste-stream compostables within your yard and community
- Easily practiced with lasagna and hugelkultur style gardening
- Potential for warmer soil through action of composting-in-place
Disadvantages
- May require time and labor to locate appropriate low-cost materials (like manure) and transport them to your site.
- May require research into the best soil components for your growing conditions.
- Soil will not look as uniform as a purchased vegetable growing blend.
- Nitrogen tie-up during break down, particularly for high-carbon mulches (straw, woodchips, etc.)
- Imbalance of carbon to nitrogen ratio may result in soil nutrient deficiencies or pH that needs modification.
Tips
If you are cheap and patient, natural soil building is the garden method for you! Pile it on and sit back – gorgeous soil will be yours, eventually. And this isn’t to say you can’t plant your DIY soil before it matures into a more broken-down, chocolate-cake textured tilth. Just don’t expect your best results in the first year.
Something I will often do in a new compost-in-place based bed is dig planting holes in the mess of straw and woodchips that makes up the top layers of a new bed and fill those holes with finely screened compost or commercial planting mix. I will then transplant or seed into those pockets of “perfect” soil. This gives the seedling the best possible start and by the time roots reach the loose pile of organic matter that is the rest of the bed, the plant is mature enough to start mining that mix for nutrients and moisture and contributing to the positive breakdown of the bed.
Everyone and their Grandmother has some “named” version of deep-mulch composting in place, which is all this really is. Check out any of the following to find the method that works best for you, your natural materials and your climactic area.
- Lasagna Gardening: original method and simplified method.
- Hugelkultur: overview article and my experiments with hugelkultur
- No Till Gardening: Ruth Stout did it naked. OSU prefers it with black plastic.
- Back to Eden Gardening: Watch the original free film and prepare for woodchips and Bible quotes. I love this film. Christian gardeners may find it beyond inspiring. Deep-mulching non-Christians who aren’t bothered by the Evangelical overtones will find much to love as well.
Buy Your Soil
There is another way to get vegetable growing soil. You can just buy it. Fork over some cash and wait for a guy with a dump truck show up and deposit 2 (or 18) cubic yards of finished growing mix right in your driveway. I’ve gone this route too, and there is nothing wrong with it.
In fact, though buying your soil has less DIY cred than the hands-on artisan creation of tilth, I once ran the numbers and came to the conclusion that, by buying a few cubic yards of ready-to-plant soil, I could start a new section of garden a season earlier and thereby grow enough vegetables to offset the investment in the initial dirt. (P.S. – You want someone to help you justify spending $300 on dirt I am always your girl.)
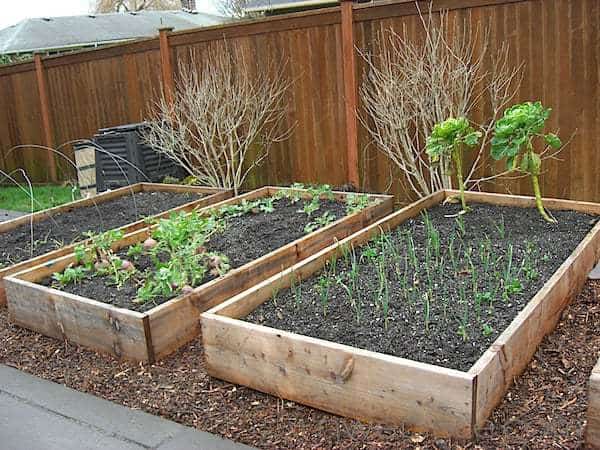
The timeline looks like this: call compost company, give them your credit card, set up a delivery date. Spend a few hours hauling your soil mix to your garden or shoveling it into raised beds. Wait a few days for your new soil mix to cool down (it often arrives steaming hot from residual composting activity). Plant. Instead of a year or two for really nice tilth you wait only as long as it takes for your credit card to be authorized.
Premade garden soil also plays very well with raised beds. Urban gardeners like me like our raised beds, and for good reason – they are fast to set up, easy to work, and allow us to sidestep issues of drainage, compaction and native soil contamination. As it so happens, one cubic yard of soil just about perfectly fills on 4’x8′ raised bed ten-inches deep. Those kind of calculations are simple. Simple is nice.
If you want a garden and you want it now, buying your soil gives immediate gratification.
Advantages
- Immediate, no-wait finished soil.
- Consistent – a supplier’s “vegetable blend” mix is likely to be the same from batch to batch.
- Unlikely to transmit pathogens. A high-quality, professionally made hot composting process should destroy spores, viruses and other plant pathogens.
- Depending on your location, purchasing through reputable soil companies and composters may support urban composting and waste reduction projects. For example, Seattle’s largest compost company, Cedar Grove, is active in working with restaurants to reclaim food waste for composting.
Disadvantages
- Expensive.
- Components of soil mix may be objectionable. Check sources of compost before you buy – is sewage sludge a component? Is the compost component likely to contain residual herbicides or pesticides? Is the composting process hot enough to kill invasive weed seeds and rhizomes?
- Sterile. The same hot composting process which should kill pathogens will also kill beneficial soil microbes. Your purchased soil is, at best, a blank slate.
- Will probably need supplemental fertility.
- Quality is highly dependent upon individual blend from soil provider. Do not assume one provider’s “planting mix” is equivalent to another’s.
Tips
Before investing your hard earned cash in ready-to-go soil, get a sample. I cannot emphasize this enough. I once bought 18 cubic yards of planting mix based on the description of the mix from the owner of the company who was selling it. Big mistake. Huge. The few dollars a yard I saved over higher quality planting mix were quickly spent on supplemental compost to amend the crappy 18 cubic yards I came to possess.
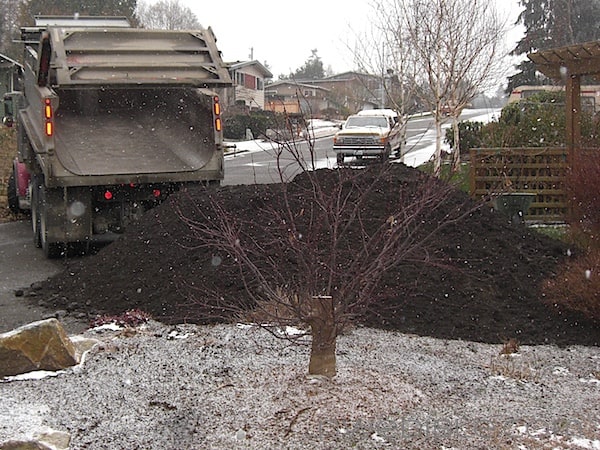
A good ready-to-go vegetable planting mix should be a blend of compost, loam, sand and aged manures. Mixes will vary by manufacturer and the ideal mix will change based on your location but should always be well mixed and screened to 1/2-inch or smaller. Mixes for a vegetable garden should typically be about 20% organic matter and free-draining. Check your sample: a good garden soil is dark, crumbly and moisture-retentive.
In two sentences I have just invoked the phrases “moisture-retentive” and “free-draining.” I know, it sounds like an impossibility designed to drive gardeners crazy, but really it’s not. It’s a strange miracle of compost that it can be both moisture-retentive and free-draining at the same time. I know of nothing else that manages to be so charming in its bipolarity.
Either Way…
Either way, you may need supplemental fertility or pH correction. This isn’t necessarily a failure on the part of your soil building or your soil buying. Typically, an immature compost-in-place bed is quite acidic. This is normal, it’s a part of the composting process itself, actually.
According to Cornell University, “During the initial stages of decomposition, organic acids are formed. The acidic conditions are favorable for growth of fungi and breakdown of lignin and cellulose. As composting proceeds, the organic acids become neutralized, and mature compost generally has a pH between 6 and 8.”
Even your “finished” planting mix probably won’t be perfect right out of the gate. My experience with purchased soil is that it lacks background nutrients – a hot composting process tends to burn through nitrogen a bit more than a cooler, slower composting process.
In the Pacific Northwest, where acidic conifer debris combines with nine months a year of rain that leaches alkaline nutrients from the soil, you’ve got the perfect storm for acidic soil. Clemson University says, “Rainfall affects soil pH. Water passing through the soil leaches basic cations such as calcium (Ca2+), magnesium (Mg2+), and potassium (K+) into drainage water. These basic cations are replaced by acidic cations such as aluminum (Al3+) and hydrogen (H+). For this reason, soils formed under high rainfall conditions are more acid than those formed under arid conditions.”
I use Steve Soloman’s recipe for complete organic fertilizer (optimized for the Pacific Northwest – other areas may need a different mix). You can find it here. But before committing to a regime of haphazard soil amending, the best thing to do is order soil test from a reputable university or extension service lab. The lab will make recommendations for the appropriate soil amendments based on your soil’s needs.
Additional Resources
- The Complete Compost Gardening Guide. My favorite composting book.
- Growing Vegetables West of The Cascades by Steve Solomon. The gardening Bible for Maritime Northwest gardeners.
- Organic Gardener’s Composting by Steve Solomon. Free digital book.
- WSU Extension Horticultural Myths (PDFs): Compost and Nutrient Overload
What’s your choice. Do you build your soil, buy it, or both?
3
Thanks for the awesome article on gardening… I am craving the dirt beneath my fingers!! If you are both cheap and want instant gratification for your lawn or garden (particularly vegetable garden since that is my favorite) then here is what I have done successfully:
1. I use diatomaceous earth in the dirt (I purchased mine from http://www.earthworkshealth.com) I purchased a 50# bag and it lasted me 3 seasons. It reduces the pests in the garden, and also provides minerals (especially silica) I think 13 essential minerals that are missing from our soil.
2. I use BioGrow 365. I want to stay organic, but don’t want to spend a lot of time or money. One quart lasts me at least 2 growing seasons and on my lawn. ( http://www.feedmyplanet.com/biogrow365 is where I ordered mine) — I started out with rocky soil that was so horrible. My first garden was a big laugh. The second and third seasons I used this and holy cow. I had more tomatoes and corn and peppers than I knew what to do with. My grass was gorgeous to. I wish I could post some pictures here.
I have never been able to compost. We tried. We got a fancy composter, and we turned it. It never worked for us. I can’t figure out why, we followed the directions carefully. We used leaves, organic matter, scraps from the kitchen, etc. We need to try again.
I just love gardening and working in the yard. Can’t wait for next season 🙂
6 to 12 months for ‘shrooms? Man, all it takes is a good rain and some humidity and *bam* mushrooms on the woodchips. That’s Houston for ya.
We bought our soil but spent the extra bucks for the top quality stuff. Still add in compost from time to time, but we’re happy with the results so far.
I am converting, believe it or not, an old auto mechanic’s garage into an urban farm/sustainable living experiment of sorts, in Houston. Will have my first 8 raised beds ready in 4 weeks. Where did you get your high quality dirt? Anks. WWA.
I read this article with great interest and checked the sites mentioned as well. Excellently presented, clear and concise information! It is a pleasure to see the importance of soil “health” addressed in this manner. I am located on the Eastern seaboard, so although we have similar issues, we have a overabundance of clay type soil. We’ve been gardening on this property for over 30 years using only organic methods, so most of what we use for gardening is nice, fluffy, rich soil, great for growing veggies, flowers and fruit and nut trees. But it took time to get it to that point. We use probiotics in our composting bins and on our ground in addition to a lot of the materials you mentioned in the article. We have good soil, but the addition of the probiotics and a all trace mineral product called Azomite ( both are organic products) had boosted both our production and helped make the plants healthier and more disease/pest resistant. We are also vermicomposters. The worm castings are our main source of fertilizer, as well as growing green manures to add to the bins. After reading several articles about the issues with animal manures containing left over herbicides etc, we decide to go to the green manures as an alternative. I particularly like to use the Lasagna method in a new bed area, it’s simple to apply and the materials are readily available and mostly free. Thanks again for this interesting article.
I’ve used both methods as well, and prefer the DIY, compost in place method. Not only am I the “queen of free,” I prefer to know where my dirt comes from, and we generate a lot of raw compost material. When we began gardening on this land 16 years ago, there was no horsetail and no morning glory–two impossible to get rid of Pacific Northwest natives. They rode in on purchased dirt.
Good source of cardboard when you are covering over a large area is an auto body shop or appliance store: their stuff comes in large boxes and they don’t usually mind letting you dumpster dive. I like to cover pathways with leftover feed and grain bags topped with mulch; they are path width, and the following year I have ready made dirt to top up the raised beds next to the paths. Make sure the bags you use don’t have a layer of plastic in between two layers of paper; I found out the hard way after the bag composted but the plastic didn’t, and I had to fish it out of my finished dirt.
I’ve done several different things. When I first started 10 years ago, I had just read Square Foot Gardening. Being the anal person that I can sometimes be, I tracked everything down to make Mel’s mix and made my happy little beds. Then I expanded, and decided it was ridiculous. The first expansion had me making my own in a Ruth Stout type of way. I made another really big expansion and bought loam and compost from my local farm supply. They make their own compost from yard waste that people drop off. It’s really great stuff and a friend with a dump truck got it for me. I’m in the process of expanding again, this time it’s the slower method. It depends on my mood, apparently.
Thanks so much for this article. The problem is that being old, I forget so much. You refreshed my memory. I knew all this info, and I have been wondering why I have all that cardboard saved in the shed. I have home made tumbling composting barrels that I used to use, but with all my critters now, no more scraps. I unexpectedly discovered 2 new born potbellies yesterday. I needed some straw to make bedding for them, and the only place I could find bales of straw had a minimum of 10 bales. Your article, plus my stored cardboard, plus all this straw, equals what I will be doing today…Thanks so much for all you do. I was wondering. Can you compost douche waffles?
Thanks for your article. I may have missed it in your post, but I didn’t see anything there about testing your soil before you do anything major. It has many advantages, and in some parts of the country, your county extension provides it free of charge, or for low cost. The test will tell you how much organic material is in your soil already, the ph and lack or excess of nutrients. It will also identify contaminants such as lead. By testing your soil, you soon learn there is no such thing as a “complete”, or “balanced” fertilizer. For example, when I moved to my new location on Whidbey Island last year, I had my soil tested. It had excessive amounts of potassium and phosphorous in my soil. (Soil tests usually do not test for nitrogen, because it usually leaches out fairly quickly and is not a very reliable number). The university that tested my soil recommended that I do not, under any circumstances, add potassium or phosphorous to my soil. So, the “complete”, or “balanced” fertilizer for my situation was just nitrogen, not the balanced mix which Steve Soloman recommended in your reference. If a person in my situation had used his complete organic fertilizer mix, they would be adding excessive phosphorous and potassium. My solution was ammonium sulfate, or my ultimate choice….blood meal. That was for my situation a complete or balance fertilizer. Also a soil test accurately gauges your ph. Gardener’s should not be throwing lime or sulfur on their soil without knowing the ph they are at and the optimum ph for what they are trying to grow. One last thing that everyone reading your posts probably knows but we forget sometimes. Compost is not soil; it is a soil amendment. It improves the tilth and cation holding capacity of the soil, but having a load of compost delivered and planting a garden in it is not a good idea. Use it to amend what soil you have.
Thank you – this is an excellent addition to the conversation and I’ve amended (hah!) the original post to make reference to soil testing, and thrown in a few “compost contrarian” links from WSU to help people get a more balanced view on the potential dangers of overloading the soil with organic matter. My view is that organic matter, even in pretty hefty quantities, if applied as a top-dressing/deep mulch will have upside benefits in soil building without many of the drawbacks posed by tilling in large amounts of OM. However, I have yet to read Solomon’s most recent book (The Intelligent Gardener) and I am ready to be proven wrong – I’m always eager to learn a better way to grow veggies. 🙂 One more thing I will add is that soil testing really has to be at a lab. Those at home kits are basically worthless and I do not recommend them.
“…I know of nothing else that manages to be so charming in its bipolarity.”
You never met my ex-husband.
Aimee – you beat me to it! 🙂
Adding to Dan’s comment, compost could actually lead to further nutrient imbalances in the soil. True, you will still have organic produce but it won’t be ‘nutrient dense’ which Steve Solomon has ‘seen the light’ in his latest book ‘The Intelligent Gardener’. Some of the tenants: moderate amount of organic material, proper balance of calcium to magnesium, P to K, and CEC which are the exchange sites and usually boosted with the proper calcium level. International Ag Labs did my test and gave recommendations and put me in touch with someone who could blend the needed rock powders. Solomon uses Logan I think and on his web site has spreadsheets that use their results to calculate what you need.
So my soil was too high in organic material (I would routinely dump truckloads of horse manure every year), and Phosphorus (I added all my wood ashes each year). They said my calcium was decent for Pennsylvania (I always added several 40 lb bags of gardeners lime for the pH offset to acid rain). Now I am getting it to ideal soil to grow high brix crops.
But one thing I learned is that this soil may slow down the initial growth of plants. It’s not like potting soil! So this spring the plan is to prep the row by incorporating finished compost and a starter fertilizer (Intl Ag recommends Jubilate but I also have ‘High Octane’ from Agricola which is rock powders, lava powders, kelp, bone, mycorizal, etc). I’ll till that into a narrow row for the transplants. Let them grow initially (consuming lots of nitrogen) then as they begin setting fruit the root zone should then be expanding into the normal soil. The transplants can use the initial burst of nitrogen for plant and leaf growth. But if too much nitrogen is in the soil, the plant picks that up instead of the other nutrients. Basically you will have a low brix fruit (think of industrial agricultural plants living off NPK fertilizers). Anyway, read the book for all the technical details.
Fascinating, and great synopsis. Thank you for chiming in. I’m looking forward to reading Solomon’s latest book even more now!
Oh, how I wish that I could smother some of the grass with cardboard here. Just uncovered a spot that has sat under cardboard & 6 inches of mulch since March and it was pale, but by no means dead.
I’ve been cleaning out the sheep barn in anticipation of lambing season. It’s been a few years since I went all the way back down to the dirt floor (I deep litter the barn as well as the chicken coop). Taking out some gorgeous stuff and making some new garden beds with it. Now for spring to hurry up and get here!
One of the jewels in my gardening book collection by Steve Solomon: http://www.newsociety.com/Books/G/Gardening-When-It-Counts
I’m definitely a “both” kinda girl. Can’t wait sometimes so I buy the good stuff, but I’m in a perpetual state of composting chicken poop and whatever was last in my garden. Now I’m itchin’ to see what’s going on in the composter….
We moved to a new city in the middle of summer. The home I left had a big, fenced, 30X50 garden with a big greenhouse that would puke out veggies in the summer. The house we moved to, was a much smaller property without a garden. it had a single, tiny little bed running along the south side of the house. That was it. Sad, but on the other hand a blank canvas to design our garden. The problem was, we had over the years, we’d worked our way up to having grown 500 bulbs of garlic, which we wanted to plant in the fall, but had nowhere to put them. As much as I would have loved to have collected materials and built my garden slowly over time using the full on lasagna method, I had to call the dirt guy and have 8 yards of not-so-cheap garden mix dropped at the home. The cost hurt, but I looked at it as a trade-off, our garlic rocks, better than any organic grocery store stuff you can buy, and if we sold it would net us at least a grand, so in the grand scheme of things I figure we broke even, our soil was paid for by the garlic we don’t have to buy next year.
I have never achieved really hot compost so it turns into worm compost; all the better I think, let the worms do the turning. Hard wood shavings from a neighborhood cabinet shop with kitchen scraps worked well before I inherited the farm. Now I am using the dried grass we mowed from the field at the end of the growing season.
My in place composting is the grass I mow from the field with a power scythe. I have 4 hand scythes but at 73 I appreciate gasoline power. I pile the grass a bout a foot high and cover it with old carpet. the carpet keeps the light out to discourage sprouting and makes a habitat for my soil engineers. Mycelium, worms, beetles, and their predators, moles, voles and snakes spend the winter working the soil. For the 2013 pumpkin patch I only had to plant the starts from the green house to spaces between the strips of carpet. No weeds and clean pumpkins.
Spring I will role up the carpet and plant vegetables there and the pumpkins will move to to the patch that I started this year.
Great job breaking it down! I have done both in my own yard and my clients’ yards. I agree that source is very important. I switched a few years ago from a clay-ish mix to one with more organic matter and have been much more happy. I am buying a new house and have a bunch of experiments lined up to help me explore the different ways of creating gardens. I am sometimes torn between methods but have moved more towards raised beds for clients because they want insta-gardens and I don’t blame them at all!