Looking for a gardening system that brings crops to you with little or no bending, reduces weeding to a bare minimum and is so cute it puts cat videos on YouTube to shame?
Steven and Bea, readers from Williams, OR emailed me last month to share their “Pedestal Planter” technique for growing bumper crops of edibles. When I saw their garden I knew I had to share their success with you. This is some seriously inspirational stuff.
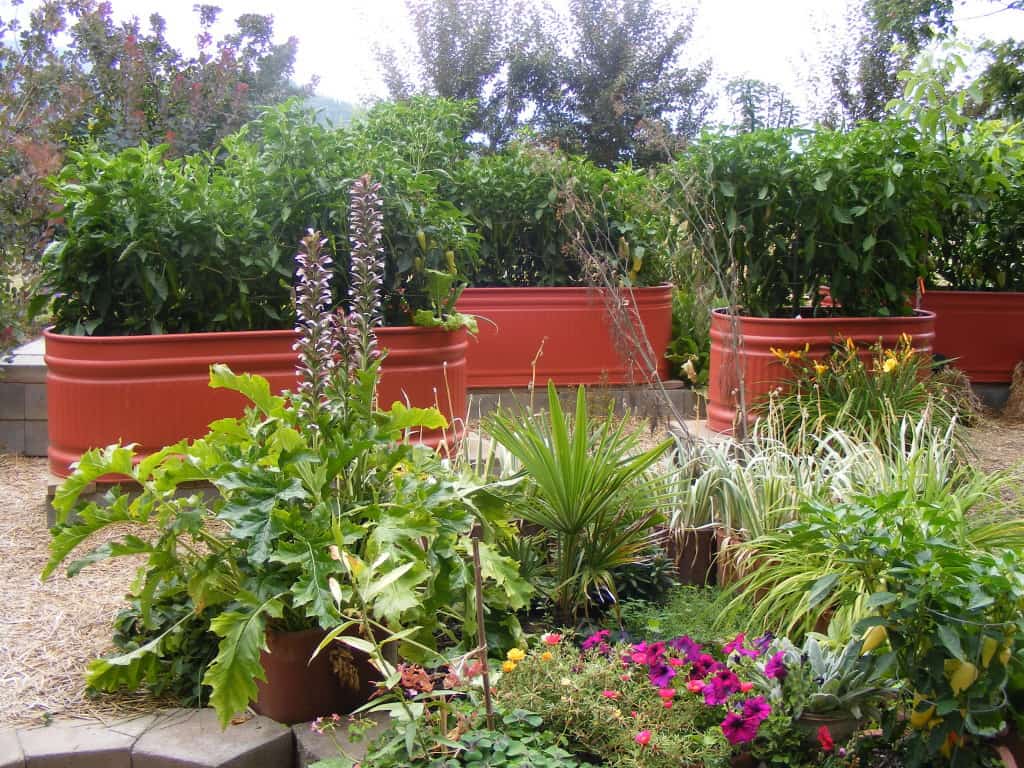
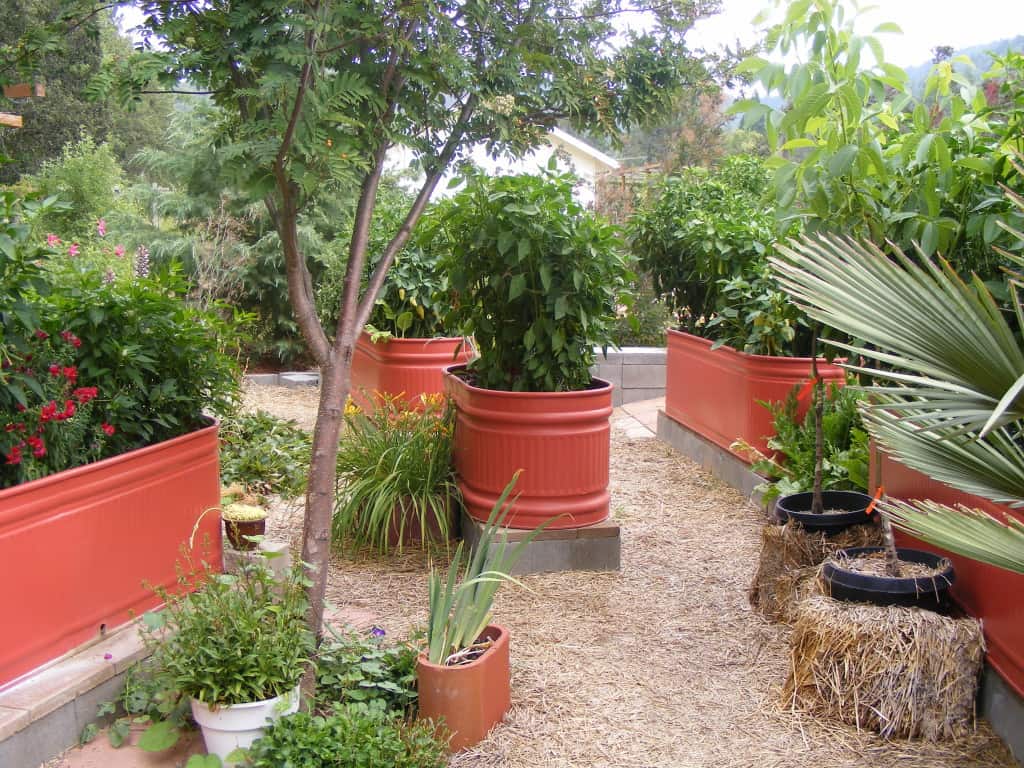
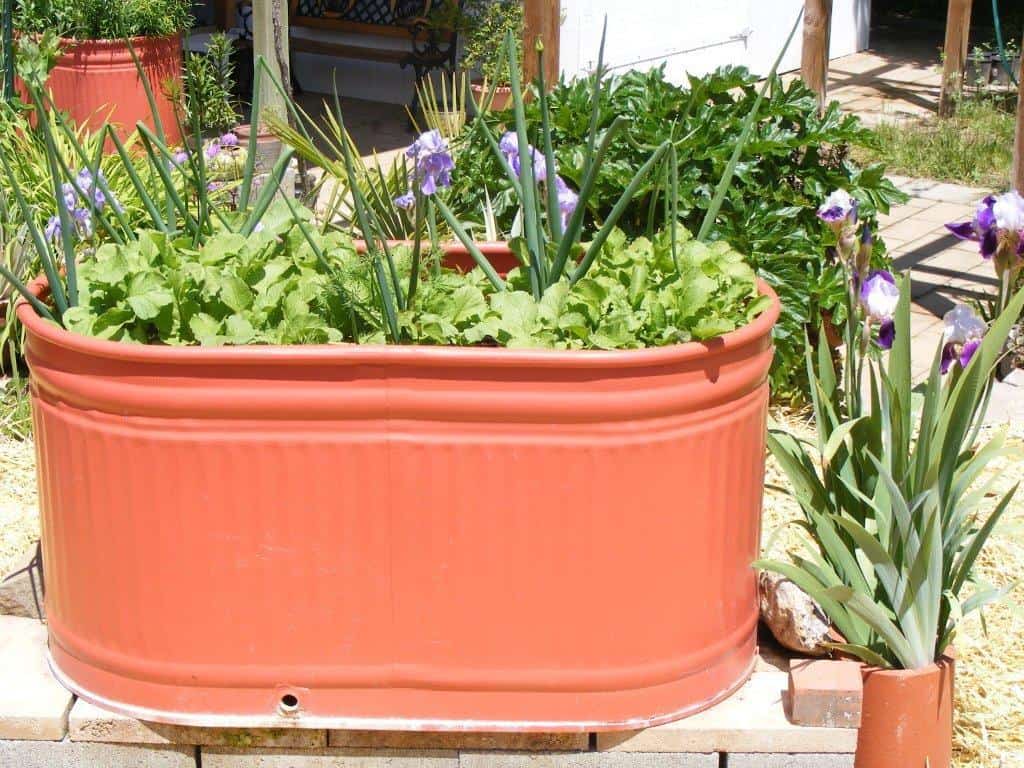
Steven’s philosophy is, “More people would garden if the soil were but a little further from the ground.” In order to bring their growing area to a comfortable height, Steven and Bea combined metal stock watering tanks with bases of concrete block to create waist-level, extremely low maintenance raised beds that do double duty as a lizard and frog habitat.
Steven and Bea were kind enough to explain how they created their easy-to-maintain paradise of edibles:
These are livestock watering tanks on cinder block risers to make raised beds. If done right, there will be no weeding and no bending.
The ground under foot is covered with straw to choke out the ground weeds. Weed seeds tend to blow along the ground no higher then eighteen inches so we surrounded the whole garden with a field-fence covered in honey suckle and daylilies at the bottom. A drip line runs along the bottom of the fence so there is no hand watering there.
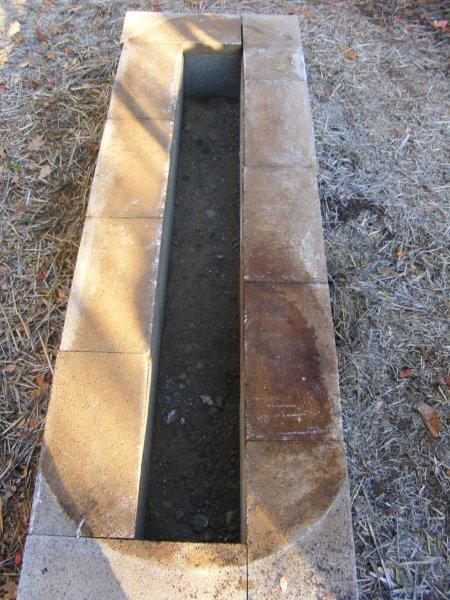
To make the base for the tanks I lay down a floor of wall capstone completely covering the ground so rodents won’t use it to empty their warrens of excess soil. Then a surround of textured and colored cinderblock. Don’t use the gray flatface block like I did here. Cap the blocks with wall capstone to better distribute the weight of the tanks (I call them pavers).
Prime then paint your stock tank in a nice color like terracotta then place it on the base. Add some artwork to the sides to dress it up.
Form a cavern of pavers around the drain hole to keep back the gravel. Frogs will inhabit the cavity so its best to point the holes away from the afternoon sun or protect it with a chimney liner full of day lilies so they wont over heat. Then fill with five inches of gravel then a half inch of pea gravel then a half inch of granite. That should provide excellent drainage.
Fill the tank with compost. The top of the soil should be above wrist height when you’re done pressing it down. That’s very important. You must be sure to raise the tank with extra pavers to a height so that the soil will be convenient to your hand. No bending is the big idea.
The Pedestal Planters come with a welded in drain hole with a drain plug installed. That’s all you need as far as drainage is concerned because the gravel substrate conducts all excess water to the frog grotto.
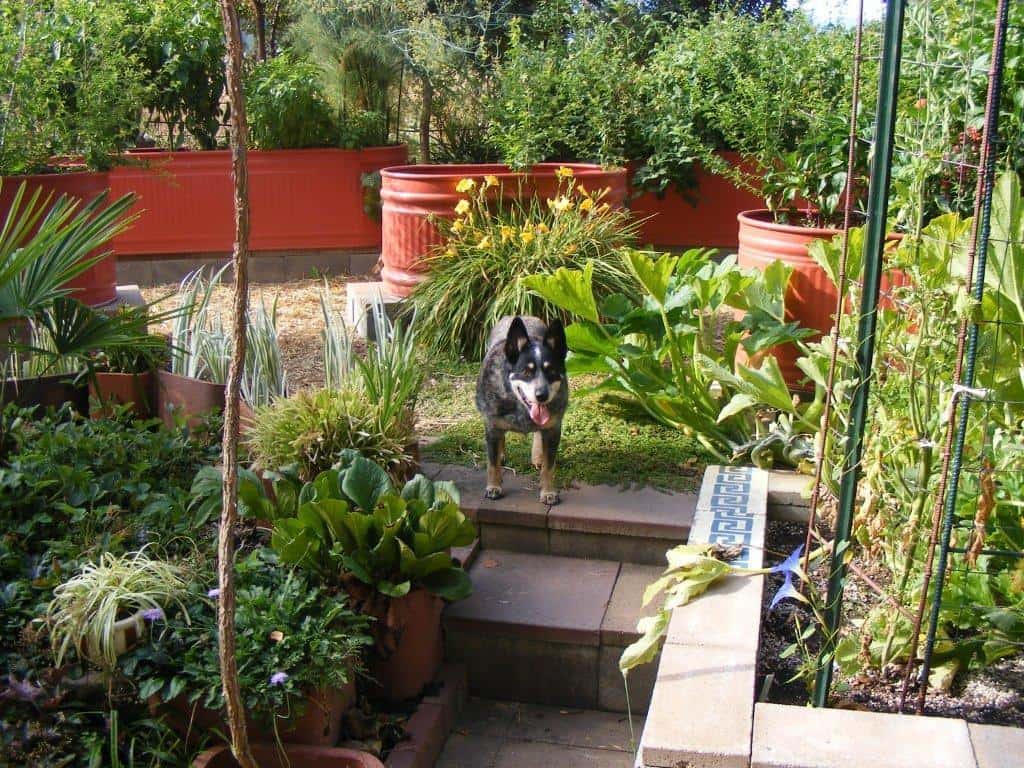
Below: “The ground cover under our dog Lucy’s feet is Corsican mint. I don’t know if chickens will eat it or not but we are going to find out. The rest of the area is all straw covered. This eliminates the task of mowing or weeding on the ground.”
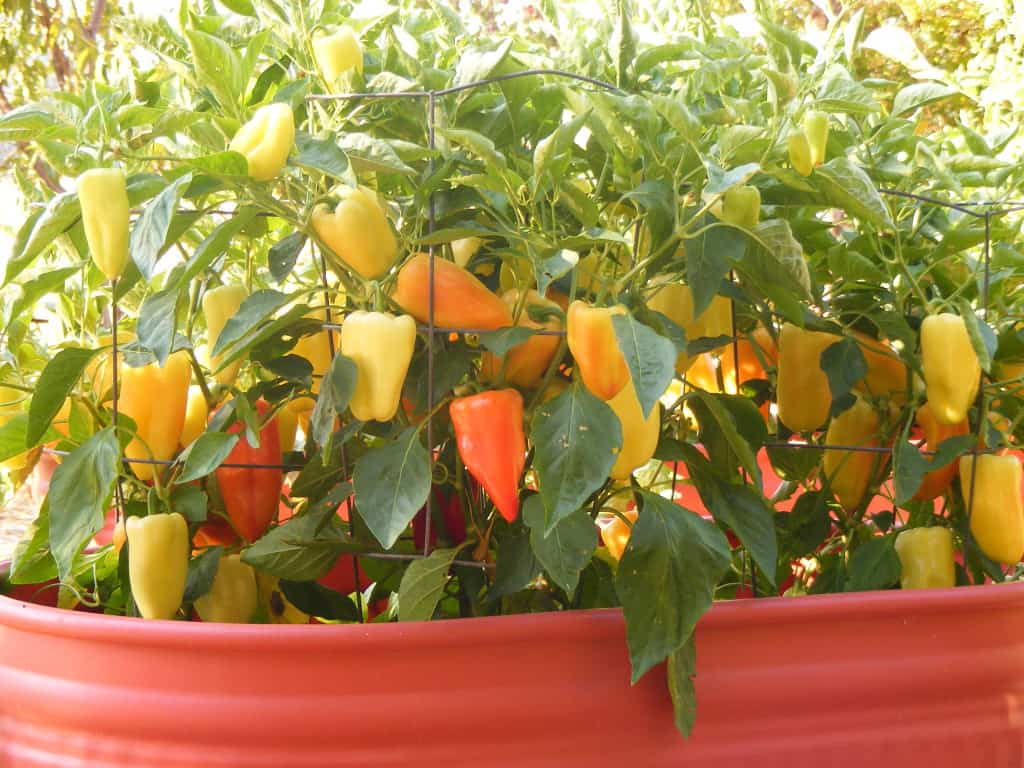
Below: “If you plant peppers in a tank and you have the ends pointing east to west then the long side on the south will be all green leaves and the long side on the north will have the most beautiful display of colorful peppers.”
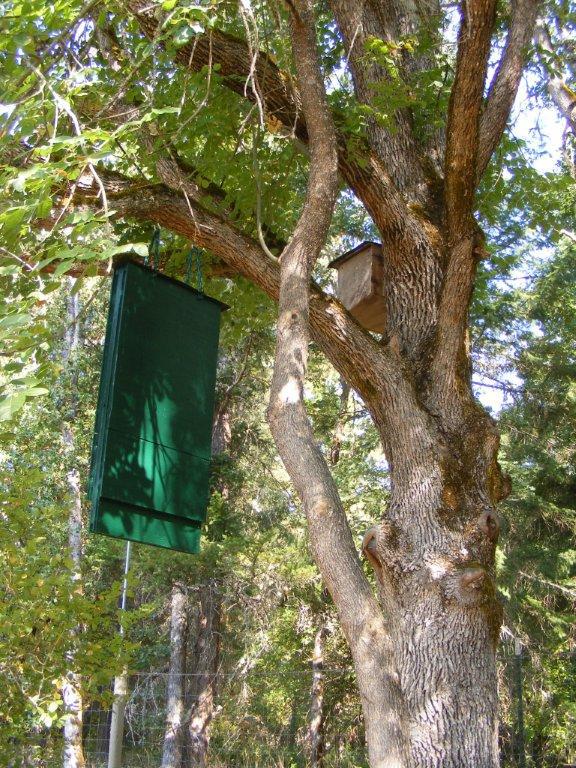
Below: “Don’t forget to hang a bat box in a convenient neighborhood tree to keep down the West Nile Virus bearing mosquitoes. Lots of free phosphorus there. Bat guano is expensive. Two sheets of t1-11 paneling and some 1″X2″ furring strips make two of these three chamber boxes.”
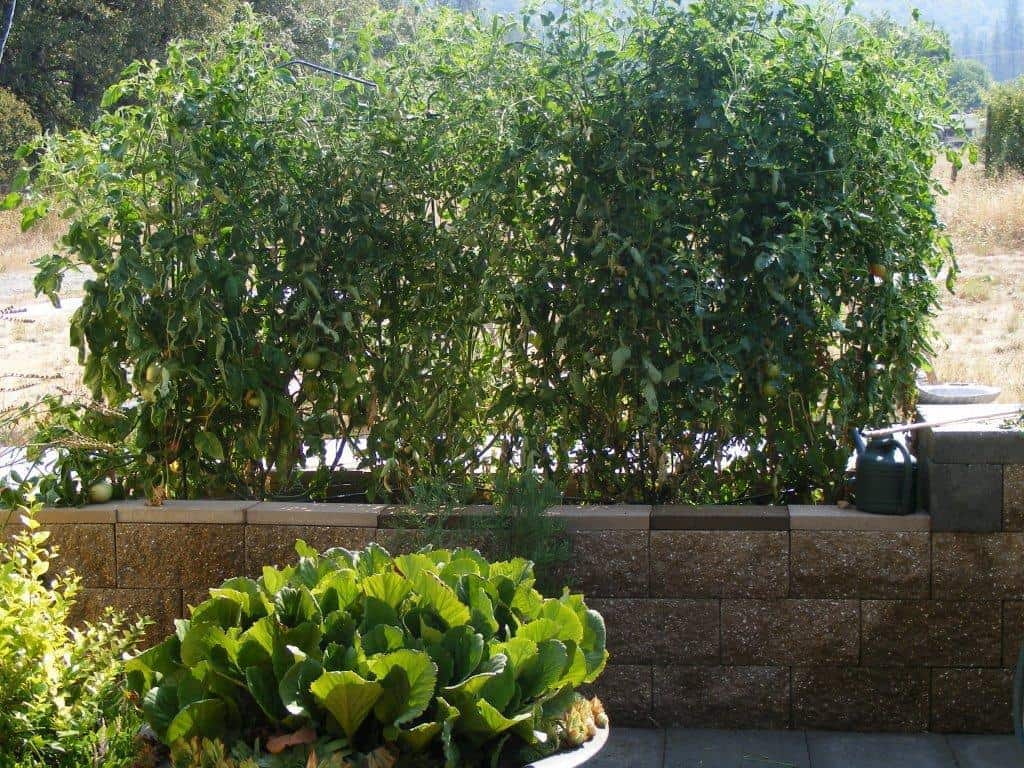
Steven and Bea’s three block high planter: “This years tomatoes are monster big. At three blocks high its very convenient to sit and groom. I can also stand on them and tie without the bother of a ladder.”
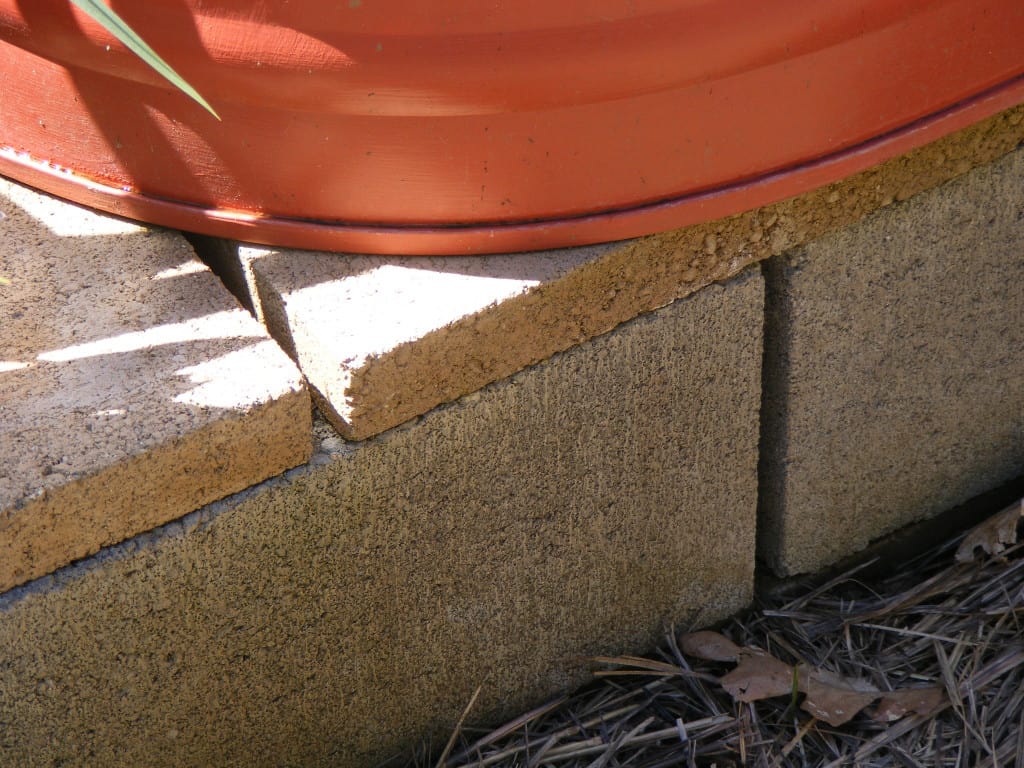
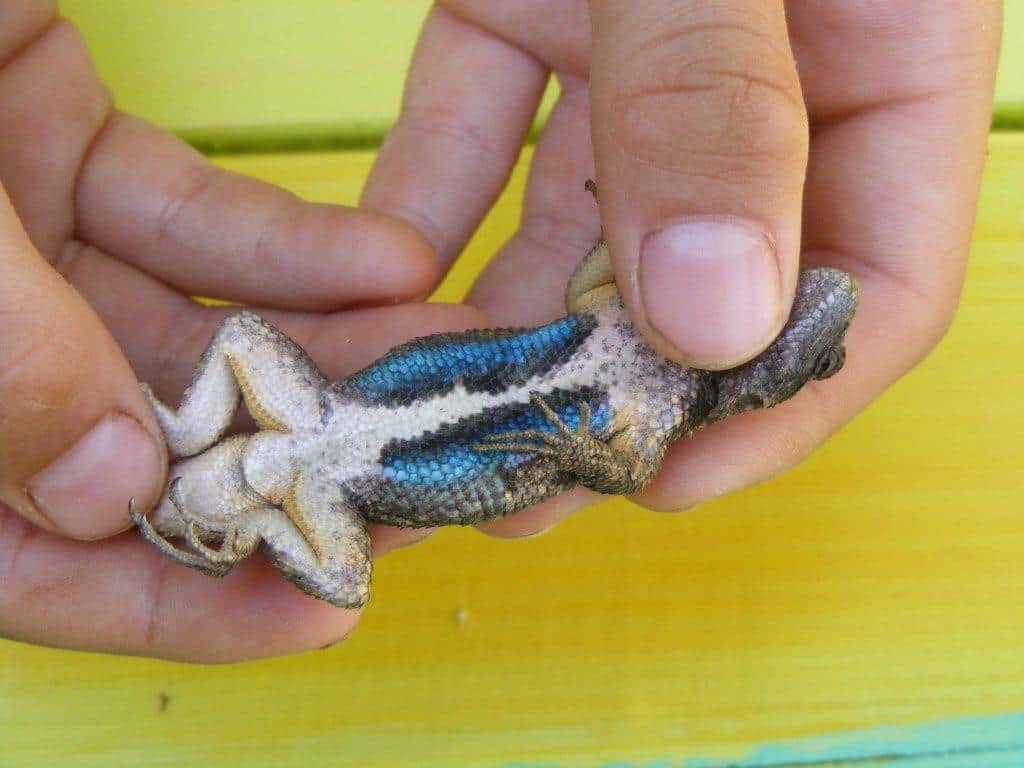
Lizards and frogs take up residence in the caverns behind the cinderblock risers. Steven says, “the gaps in the blocks will keep your lizards safe from the chickens and cat.”
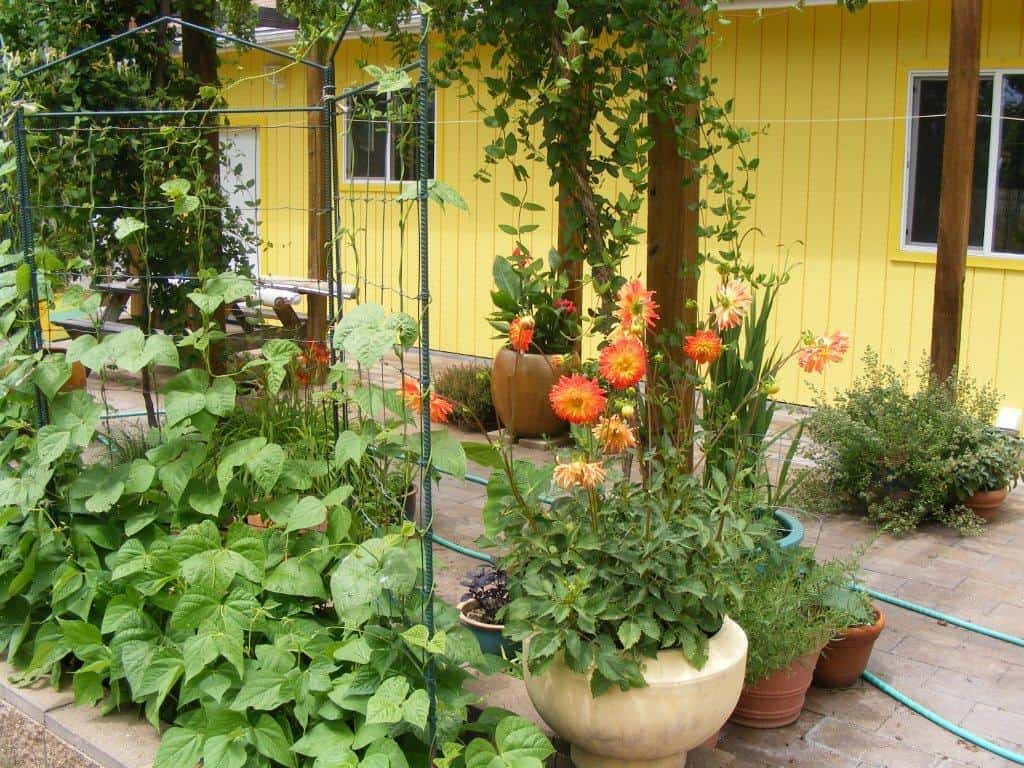
“We plant beans in cinder block planters underneath the edge of the grape arbor so they leap off the trellises and join with the grapes forming a dark green refuge on our patio. That’s a nice thing to have down here in the hot season in Williams. Yesterday the temp was 98F.”
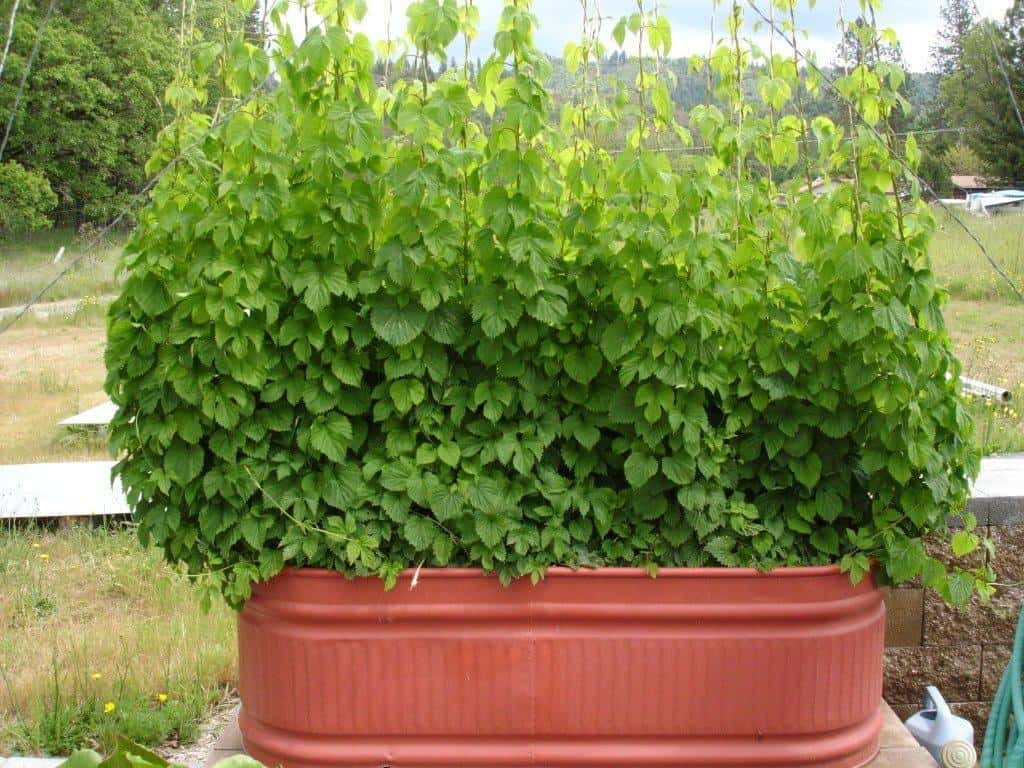
Below: “Hop plants grow very nicely in these planters if you’re a home brewer. They need fertilizer (bone meal) even with rich compost. I had to use a saw to cut through the mat of roots that was a good six inches thick.”
Steven says his Pedestal Planters have changed his gardening:
When you have your first Pedestal Planter set up you will begin to notice that you revel in how easy it is to maintain and you’ll start to look at the lower beds as primitive painful scraping in the earth. Your old beds will start to look like a excessively time consuming dirty trick some bitter ancestor played on your dim witted gardening mentors.
“Why haven’t I been told about this before” you’ll demand with glassy unblinking eyes. At some point you’ll decide never to bend at the waist again and snicker at weeds as if from an impenetrable fortress. If you dye your hair bright green and cackle at the morning sunrise you’ve gone too far!
While the up-front cost of these tanks ($130 to $190 or more depending on what size you get and where you live) is greater than our cheap pine raised beds, they do offer some real advantages, including longevity, protection against invasive roots and little burrowing creatures and ease of maintenance and weeding. Steven thinks they pay for themselves in wear and tear on the low back from reduced bending, too!
Plus, you gotta admit – these things look fantastic.
Thank you to Steven and Bea in Williams, Oregon for sharing your beautiful and functional garden with us.
If you have an inspirational and unique edible garden and you are interested in sharing it with the world, drop me a line. I can’t promise anything, but if your garden has some serious wow factor, I’ll try to show it off for you.
All images this post copyright Steven and Bea in Williams, Oregon. All rights reserved. Used with permission.
120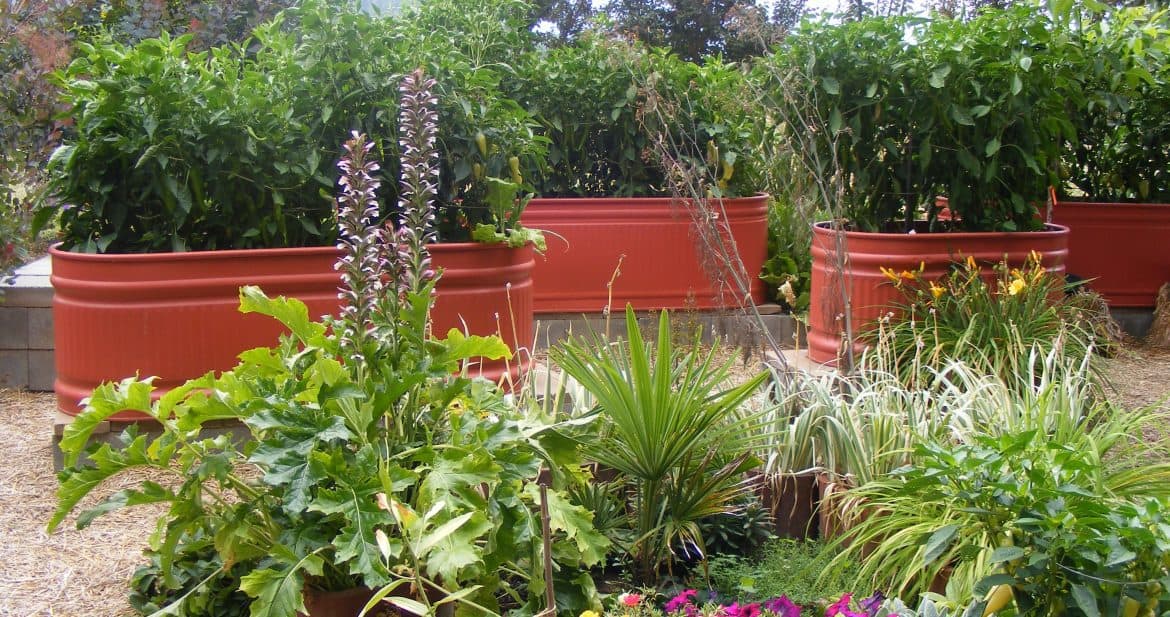
wow! beautiful garden, but looks expensive! does the cost you mentioned include the cost of the concrete blocks? I went with a Fir 12×12 raised bed this last spring, but thinking on the access problems i had will be going for 4×8 or maybe 6×12 for the ones i will be making this spring.
Wow, I wish that would work here, but we have invasive bermuda grass everywhere and that lovely clean-looking straw-covered area would soon be covered with bermuda. It goes under and over most obstacles and I’ve even seen it growing on a railroad tie in my front garden. *sigh* I wonder if I’m too old to transplant myself elsewhere.
Oh wow – I cannot possibly convey how much I want to do this – it looks amazing, and so productive! I’m not sure how well it would go over with the landlords here – I had to be a bit sneaky with this year’s container garden – but I love the idea, and it looks like there aren’t a lot of limits on what you can grow with a system like this.
Really nice write-up, E, and Thanks Steven and Bea for sharing! Firstly, “More people would garden if the soil were but a little further from the ground” is just brilliant.
This garden is very well thought out: The orientation of the drainage holes away from afternoon sun and using the spacing of the blocks for critter habitat are very clever ideas. I didn’t know about the wind-borne weed-seed height. That is something that I will implement in my garden … I’m building a mixed-species English hedgerow in my backyard that will be 12 feet thick (on a standard city lot, no less!) mainly for habitat, but it will affect the wind patterns.
And, can you tell us more about how to construct bat-houses, please???
High-Fives all around!
Thanks for sharing this! This is exactly what I’ve been looking for. No bending, no weeding, and attractive for an area that also is used for outdoor entertaining!
Wow, nice article. Well done and thank you Erica.
Cinder blocks are cheap. Build one of these a year and they are affordable. They also pay for themselves in cost savings.
OMG I LOVE this! With age creeping up we will have to start to consider stuff like this. I am also thinking rodent deterrent! If you put hardware cloth on the bottom it should be seriously vole-proof.
Thank you for posting this for us even with sore eyes. Take care of yourself!
Hardware cloth will rust through in four to five years with direct ground contact. At $0.87 a piece the pavers are cheap enough to carpet the ground underneath the pedestal.
The pavers or capstones are 2x8x16 and will last forever. Being cinderblock material they also drain very well.
Wonderful garden, I’m envious….
Smashing idea and great inspiration, which we need more of because we are three weeks away from moving into 13 acres just outside Merlin and know we will be facing a massive catch-up after the property has been unoccupied for years!
Have been to Williams many times and appreciate the many nurseries and family gardens there. And I LOVE your planters! Just one concern….does it matter that the tanks are usually galvanized?
They are all galvanized. Prime then paint the entire planter. It should last fifty or sixty years that way. Our oldest planter is ten years old and still looks like new. You might need to touch up dings from shovel scrapes but wont need to repaint the body for at least fifteen years if you use quality latex primer and semigloss latex paint.
I’ve seen my chickens jump fairly high for a tasty flower – they almost completely denuded one tomato plant of blossoms this summer when they got loose from their run. But that added height might do the trick. I’ve been gardening in my front yard, I wonder how the neighbors would feel about these… It may be time to test it out.
Steven I love that you are thinking of how to accomodate creatures in your garden. Cute lizard!
I LOVE this idea. I think that it could be adapted very easily for subirrigation – basically making them huge self-watering containers.
Quick google search did not easily yield a good source for the tanks though – ugly plastic ones keep popping up, and the attractiveness of the painted steel is a big selling point for me. Any ideas on how to find them? I don’t think the price is excessive at all. Look how much Gardener’s.com is charging for their 3×3 self-watering raised beds that still require much bending!
Also, ideas for installing trellises or hoop covers?
My dream, one day, is to have all my garden beds be raised and combine the “wicking worm bed” subirrigation/composting tech the Aussies came with with and the two-layer hoop houses that Eliot Coleman describes in his books on winter gardening.
Your local feed store will have these livestock watering tanks. They come in various sizes. They are two feet wide and tall. Four, six and eight foot long.
wow beautiful … excellent idea, it would be good for the share in http://www.agronet.gov.co know that in Colombia. It’s amazing
Beautiful garden! I love that its so well thought out. I may need to try something like this when the real gardening happens- Kodiak island is wet, wet, wet, with lots of slugs. Looks like the large, raised containers could offer drainage AND slug protection!
I found these lovely water trough beds: http://www.corrugatedgardenbeds.com I am going to paint mine terra cotta as well – I like the look! Thanks for the suggestion.
The tanks I saw on your link are shallow and wont allow for a two layer gravel drainage bed. Large at the bottom and small gravel on top of it.
The tank needs to be at least two feet high. The big idea here is “No bending” so get the tall tanks and raise them to navel height.
I just bought 3- 2x4x2 oval “stock tanks” like these at Tractor Supply Co for $89.99 each. =)
I like the original finish so I didn’t paint them. Got my tomatoes in today and it looks great!
Gorgeous and functional, I love it. Very practical for keeping ground critters out (from underneath, at least) which is a big problem at my folks’ place.
Steven (and Bea), if you happen to build another one in the future, would you consider taking photos along the way for us visually-oriented people? This is definitely something I could do here – we have an apartment with a huge, useless driveway and absolutely no yard. Inspiring!
I love it! We’re planning to put in cinder block raised beds (though I love the watering tank idea) and I’m looking for ways to paint/decorate so they’re not an eyesore. Did you use cinder blocks for the bed with your tomatoes or is that scultpured stone? If cinder, how did you get that look?
They are called “split face” cinder blocks, and we buy them for about 2.70 $ at the local brickyard.
This inspired me so much. Went out this week & got a 2x2x6 tank; primer is drying now. My aching joints are looking forward to the “raised relief.”
Congrats on having the best looking container garden on the Internet. I’ve been using homemade sub-irrigated containers using 27 gal “Commander” plastic tubs, which are $10-12. But after seeing your garden I was motivated to emulate your setup. I purchased 2x 100 gal tanks and plan to get more. I would have gone with the 2x3x8′ version but they would need a truck, and be difficult to move by myself.
Mine will be sub-irrigated, with 4″ perforated irrigation pipe topped by weed fabric, builders sand and my soil mix. For anyone considering this, there is no need to drill a hole higher up. Just add a vertical section of pipe with fitting to the existing drain, and cut it to the correct height, 4″ in my case. Use clear vinyl hose and you have an easy view of the water level.
One thing to mention: “Then fill with five inches of gravel then a half inch of pea gravel then a half inch of granite. That should provide excellent drainage.” Drainage is determined by the properties of the media you use. Whether you have 1″ of gravel or 1′, the drainage will be unchanged and your soil mix will hold the same amount of water. Google “perched water table”. Not that it is a bad idea to use gravel. With the drainage hole open you will get more expensive to your soil.
I like using the drainage pipe because it guarantees air space under the soil, which is pulled in through a vertical section of pvc pipe used for filling. Do you have a blog or YouTube channel? I would love to see more of your garden. Thanks for sharing.!
Ugh, autocorrect. That should have read “With the drainage hole open you will get more airflow to your soil.”
This is an impressive garden. My wife and I are in the process of copying your ideas/concepts. We know exactly how many troughs we are going to purchase and where we would like to place them. I have a question regarding the straw. Did you put down a substrate like a weed barrier down before spreading the straw, or did you lay it directly on the ground? Either way, how thick and/or how thin did you spread the straw media?
Its just 3 inches of straw on bare dirt. Nothing else is needed. You will get a few weeds from blown in seeds but for the most part it will keep it maintenance free. It is also there to keep the dust down. You will need to replenish it occasionally but that’s part of the fun of low maintenance gardening.
I like the idea of using stock tanks for a raised garden. I have a local store that sells them but one thing that concerns me is something I read in the description of the product. “a four-ply double-lock seam at the bottom sealed with Pliogrip Adhesive/Sealant Seam Sealer for a superior bond. ”
Obviously, the intended purpose of these tanks is to supply water to livestock and that means keeping all the water in the tank. Would the sealant in a new tank leach out into the soil over time and affect the soil in a negative way. Last time I checked consuming silicone as part of your diet wasn’t a very healthy option.
The bottom seem is below the gravel drainage so anything down there will get washed out.
Can your chickens hop up on the planters and eat your crops?
They never have yet. They do pick at anything in the chimney liners which are near the ground. I think it’s a matter of proximity. We plant things they don’t like in the liners like egg plant and basil.
I have read that you need to use a liner if you plant in a galvanized tank. If you prime and paint the tank inside and out – do you still need to use a liner to keep the soil from becoming toxic to your plants?
These primed and painted planters don’t seem to harm anything. The dark red even seems to warm things up early in the spring.
Latex paint lasts a very long time in direct sun so it will last longer under the soil. Ours is applied on top of a layer of good primer. The paint is eight years old and shows no sign of degradation. I don’t really know if the latex paint you use is hazardous but the manufacturer of your paint will post a material safety data sheet (MSDS) online for legal public notification reasons.
In fact, every chemical substance you buy will have an MSDS for their product. They give brief but very clear information about things like hazard level and first aid. You should do that for everything in your house. Just type in the product name then the letters MSDS and you will get all the information that is important to health and hazard.
I have read that the soil in a container planter is subject to temperature fluctuations. I wonder if the same is true for these? They are basically a big container garden as opposed to a raised bed. I wonder about this because I’d love to use this idea but I’m in cold Colorado. I don’t want to shorten my growing season any more than it is already.
I agree that putting gravel in the bottom of a container creates a perched water table. I wonder if this is a bad idea in such a container, where soil drying out is an issue.
Best,
D
The large mass of mulch or humus in the planter is like a loaf of wet bread. It takes a long time to dry out even in very high and dry temperatures.
Hi. I already purchased two galvanized troughs and plan to set them on an unused side, cement patio. Can you tell me what brands of primer and paint you used? Can I go to Lowes or Home Depot, or should I go to Sherwin Williams? I live north of Denver and the climate can be harsh. I want to paint them right the first time but I don’t know anything about painting galvanized metal. Did you do any sanding first? Thank you.
Wash them down with soap and water to remove any oils that will surely be there from handling. During the wash down use a sponge or paper towels to help remove the zinc oxide which is a loose powder and could be a source of adhesion failure. We used a high quality (KILZ) primer inside and out then painted on two layers of exterior grade semi gloss red latex on the bottom, sides and first six inches of the top interior. Touch up the dings and scrapes in the summer. Put some sophisticated art on them to increase their conversation value or leave them plain as they speak for them selves on a functional quality basis. These will be low maintenance so repaint every twenty years if only for appearance sake.
No sanding is necessary. Just remove the zinc oxide powder.
Thanks for the info. I also don’t really understand the frog grotto. Is it inside the tank?
The tanks have a drain plug on the side near the bottom. With the plug out, frogs can enter and enjoy the pool of water that accumulates there. Before you put the gravel in, use bricks or pavers that are water permeable and make a small cavity that excludes the gravel. Its really just stacking low blocks around and above the hole to make a cavity. Cinderblocks are very water permeable. If you can’t find flat pavers or cap stones made of that material to use then just bust up a cinderblock. Be sure to wear safety glasses.
We just bought our first stock tank and want to paint it to look something like yours. Can you tell me how your paint is lasting? Inside and out. Thank you.
Glad you asked.
The paint on our oldest stock tank is at least seven years old. There are no signs of degradation other than slight fading from continuous sun exposure. The factory zinc coating along with the high quality latex primer and semi gloss top coat have made these planters extremely durable. My only afterthought is that I didn’t put enough art into the finish. A compass rose or other symbol might have been nice but as is so often true simple clean lines, well-chosen highlights and colors that don’t harm the eye are proof against long years of artistic regret. As far as the inside is concerned the paint near the bottom is completely unchanged from when I installed it. I had occasion to see it when I removed a plum seedling from a planter that is at least six years old and the inside paint literally looks new. Mom Always said “anything worth doin is worth doin right the first time”.
we were just thinking this very thing and are headed out this morning to buy some water troughs. I was so delighted to find this post and your article with all the instructions already there so I don’t have to come up with the information myself. Thank you so much.
You are Welcome.
Just what I was looking for! My husband and I have been planning our “old folks” garden and were a little unsure just how to start. We have decided on galvanized water troughs for sure! Hubby wanted to stack them on cinder blocks, but I was unsure of how the weight would distribute, so thanks for the paver tip! I have a few questions. We are in Texas so heat is an issue, anything I should do differently for summer 100 plus temps? What do you think is the best width for rows between planters? Also, we have been told to drill many holes in the bottom (also with gravel 3-4 inches), but I think you only use the single plug drain. Any issues with that? We have mosquito problems.
We have started by installing a deer proof fence. Our next step is to lay cardboard down as a weed barrier with pine straw mulch on top. Also hope to use drip irrigation with timers to help as we still both work. What is your watering method? Anything new to add to the advice above?
Thanks so much for sharing and your inspiration to get us going with our forever garden!
Yesterday the temp here in southern Oregon was 108F and the plants thrive in that. We flood water in the morning before it gets too hot to go outside. Think of it as a large evaporative sponge. You need to give the whole thing about two inches every morning so the sponge stays moist but drains well. The ground is hot, the riser blocks are hot and the trough is hot but the loaf of soil is just warm. There are no heat issues as the plants will quickly cover the soil surface and trough edges. Also the lizards enjoy the heat while they shop for bugs.
We have placed straw on bare dirt as this makes a nice weed free surface. We like this because we can rake it up when it gets too old and use it to replace the ground cover in the chicken run. I found that weed barrier is an unnecessary expense that ultimately fails and must be removed. Save yourselves the trouble and just use straw.
I decided against drips because they can cause problems that go unseen. They might create a rot ball surrounded by dry inaccessible soil if you leave them on long enough to cause the loaf of soil to become saturated. This is definitely not the same as the ground.
The single plug drain makes a nice wet grotto for the insect eating frogs that will move in. Be sure to position the hole so you can keep it shaded in the afternoon. Drilling multiple holes is a novice mistake as it causes the holes to rust out and will shorten the life of your planter as the edges of the holes are not galvanized and a wave of rust will slowly move outward from them. If you drill holes no water will remain in the grotto and the frogs will find little advantage there and will opt to estivate.
Four to five feet is a good spacing between planters. When the peppers are stretching out to get more sun this will narrow and seem just right.
A deer proof fence is eight feet high. I used 10’ T posts and two strands of 4’ field fence and it is just barely enough. There were many deer that learned the hard way that first year. It felt good to bend the top strands of fence back into shape after their failed attempts to breech the walls of Fortress Salad.
Finally please let me emphasize that the soil height from the ground should meet your flat palm when you are standing straight up. Higher then that is better. Draw a “to scale” picture on engineering paper and use the palm of the tallest gardener as your preferred elevation. You might even add three inches to that as the soil will drop over time. Those calculations will tell you how many blocks and pavers you need to make an easy gardening paradise.
Thank you for your detailed and prompt answer! Have everything down on paper. Can’t wait for the real thing! If you don’t mind, I have 2 more questions:). Do you have a special potting mix? Also not sure I understand about the frog grotto. The drain seems too small for them to get inside. What’s the size of it around the drain? Sorry to be such a pest myself!
Hello Steven. Great garden look! Bought 3 trough’s ,drilled the holes and I was wandering if I have to set pebbles in the bottom as I was told just to lay screen material on the bottom to prevent soil from coming out. Next question ….. Which soil is best for vegetables and flower planting ….
Thanks
We use compost from the pile. Your local farm or landscaping store can sell it by the yard, you just need to calculate the quantity and have them deliver it. Call around.
The drain hole is ¾ inch and tree frogs have easy access. I just place two water permeable cap or paver stone made of cinderblock material to either side of the hole about eight inches apart then two between them eight inches away from the hole. That gives it the interior cavity eight by eight then lay one on top. The stones I use are two inches high so the cavity is 8x8x4.
Never use screen material or drill holes. The screen (if metal) will accelerate galvanic corrosion and the soil will eventually fall through. If the screen is fabric, insects will chew their way in to get at the moisture. Normally I place a frog and grotto between my precious compost and danger. If I live long enough to see it, I expect my planters to last 70 to 100 years with low exterior maintenance.
I really have thought this through. …Really
Hello Steve,
I am currently in the process of using your beautiful design to build some beds for my wife over here in Boise and I had a couple of questions. First, if I was not interested in creating a “frog grotto” would drainage become a problem just using the drain plug with a gravel bottom? It seems like you are the only person in the stock tank garden internet world that doesn’t drill holes in the bottom of the tanks, but although drainage is very important, I agree with you that doing so would just invite rust. That being said is the cavity the important element or could I just fill with rock? Second, am I under the impression that you do not use any type of barrier between your rock and dirt?
Brian, you can eliminate the frog space and just use gravel so long as you layer the gravel from large near the hole to small as you go up. Inch and a half minus to pee gravel or decomposed granite at the top of the drainage layer. I don’t use barrier cloth because the graduated size of the gravel is supposed to exclude the soil so the cloth is just an added expense. I’m not entirely against it though if you’re concerned about soil migration. If you use barrier cloth please check back with me in twenty or thirty years if you decide to change your soil. Drilling holes in the bottom is an amateur move and the kind of free advice from the internet we have all learned to be wary of. Thanks for helping me set this straight.
Steven,
Just to let you know your help was not all in vain! I now have a whole garden of 3×8 water troughs on two runs of cinder block(not painted though). So far everything is doing well, even though we are having that awful Texas summer heat. I really appreciate all of your time and patience helping me. Wish I could send you a picture of my seedlings! Close to 100% germination on everything, pepper transplants are good and tomatoes hanging in there.
Also, the first night two toads made a home in my smaller Growbox container. I thought about you when I saw them!
Lynn
If frost has killed your pumpkins ahead of they’ve had a chance to turn orange, it really
is not also late to save them. Cut the pumpkins off the vine, leaving a minimum of 4 inches of the vine on the top from the pumpkin. Wash them completely with
water mixed using a compact quantity of bleach to
prevent the development of mold. Bring them inside, and location them
within a warm, sunny location, turning them sometimes so the sun can attain all of the green regions with the pumpkin. Within a handful of weeks or less, you will have vibrant orange
pumpkins to carve into jack-o-lanterns or use to create homemade
pumpkin pie.
I’m very interested in doing this. I also live in Texas and want to set up my tank as a wicking bed.
Any tips or thoughts on using it as a wicking bed?
Hi Lucy. I am doing this in central Texas, but I don’t know much about wicking. I am doing my best to mimic a living, natural soil environment. I did the drain (NO DRILLING!) just like Steve said with the blocks surrounding the drain hole. Then I did the rock layers in the bottom of the tank just like he said as well. I used a local source for a bulk purchase of good garden mix and added extra compost when I filled the tanks. I also used compost as a mulch and pine needles sometimes also. My fall garden was fabulous after the stress of the heat in August and September was over. I just pulled up the lettuce plants I have been harvesting from since late October. I had a bumper crop of beets and carrots (a first for me) and also grew snow peas like crazy. Due to the mild winter I had tomatoes up to January. Everything about Steve’s system works great. I added soaker hoses for watering and have them zoned on timers, but I usually water with my wand for something to do! There is no weeding and no bending to pick! Once you plant, there is really not a lot of daily work. I just check for pests so I can blast them off with my water hose. I feel I can keep gardening like this until I am 100, it is so easy. The hardest part is carrying buckets of compost to replenish the beds for new planting. Highly recommend Steve’s horse trough gardening!
Hi Lynn! Thanks for your reply! I’m going to give it a go as a wicking bed. Will post pics if it works!
How did they get the paint to stay on the tanks?
Love, love, love your beautiful container garden. We live along the Applegate outside Grants Pass, so we’re very familiar with your area. I plan to follow your example and would like to know where you sourced your troughs? I prefer that ribbing style if possible. I’ve looked at our local Grange, but don’t like their style. Thank you!
I’m wondering if the bins are painted completely on the inside as well and whether this could have a negative impact on plants.
Hi there, I found your weeb site by means of
Google while looking for a related matter, your web site got here up, it appears tto be like great.
I’ve bookmarked it in my google bookmarks.
Hi there, just turned into aware of your blpog viaa Google, and found that it is really informative.
I’m going to watch out for brussels. I’ll be grateful if you proceed this in future.
Numerous other people shall be benefited from your writing.
Cheers!