Hugelkultur is all the rage right now. This permaculture method of raised bed building is supposed to reduce irrigation needs and provide long term fertility to plants while giving the gardener a kind of hipster garden cred that only comes from funny foreign-sounding growing techniques.
A hugelkultur bed is built with hunks of wood as it’s base – branches, logs, tree trunks, brush, etc. can all be used, and I’ve seen variants made with wood chips, though the experts seem to favor large format wood pieces.
Now, I’m not an expert (I’m not even a novice) in permaculture techniques, but I took one look at the leading instructions for building a hugelkultur bed and thought, “It’s a lasagna bed with logs at the bottom. Got it!”
And thus was born my half-ass hugelkultur bed. It’s possible I might have stumbled into permaculture perfection, but it’s more likely I have no idea what I’m doing here. Copy my garden madness at your own risk.
Laying Out New Beds
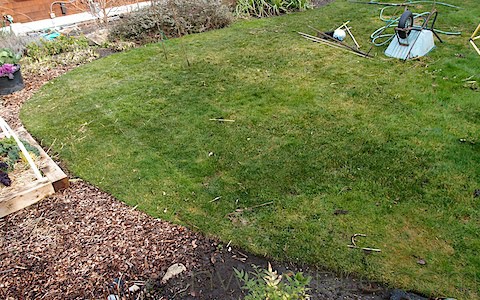
This is the patch of grass slated for conversion to hugelkultur beds.
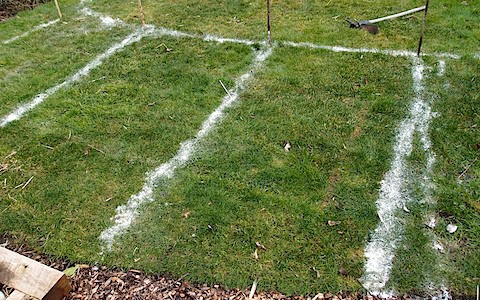
I used white flour sprinkled on the grass to define the new borders to the beds and the paths. This is a great way to “try out” new garden layouts. The flour is cheap, shows up well for a few days on grass or soil and is easy to smudge out like chalk if you want to try a different layout.
Create the New Borders
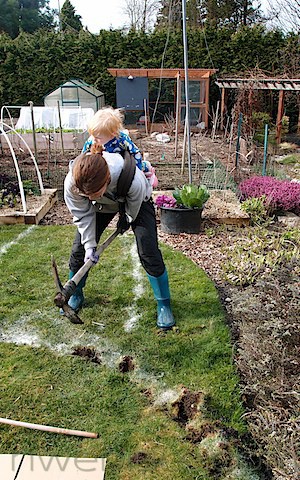
I know I made the case that you should stop ripping up your grass to grow vegetables (and I stand by it!) but I do remove a small border strip of grass when I build beds right on top of sod. This prevents the grass that is left from climbing up the new bed. It doesn’t take long to define a sod edge this way and saves loads of maintenance time later on.
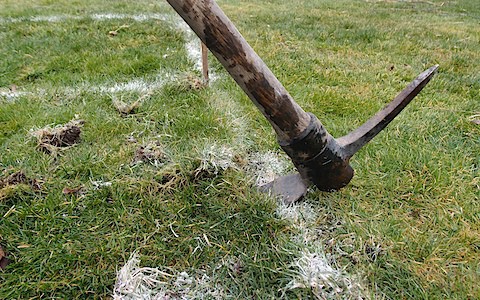
Work a mattock under the edge of the new bed.
This is yet another reason why I argue for ripping up as little grass as possible! Busting sod for two just isn’t that fun.
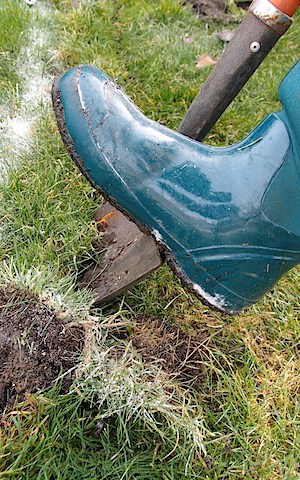
Once the edge is loosened, take a flat-bladed spade and angle in to cut away the border strip of grass. As the strips come loose, set them aside.
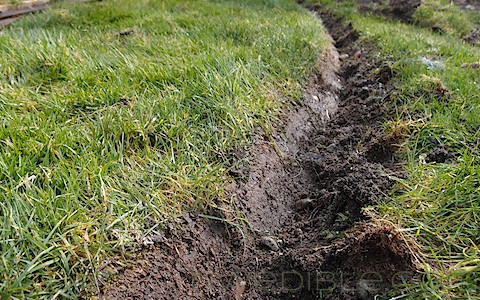
Once the sod strips (“beaver pelts” to those of you into golf lingo) are pulled up, go back and clean up the new edge of your lawn into a tidy “v” shape. The side that will become the base of the raised bed can be left ragged because it will just rot after being covered by all kinds of organic matter.
The new edge of the sod.
Assemble Hugelkultur Ingredients
I didn’t import anything except a few bags of finished compost to create these beds. Instead, I looked at them as an opportunity to utilize scrap and spare decomposables already laying around my property.
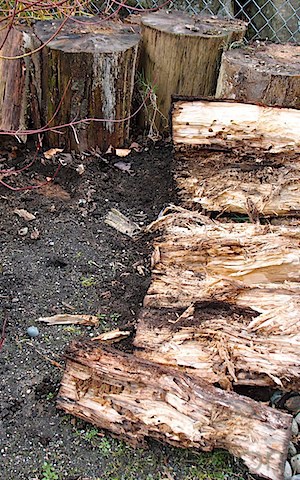
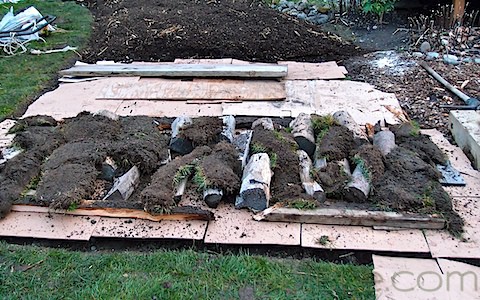
I found these old rotten logs, the leftovers from a failed effort to build wooden “stepping stones” through the garden for my daughter, and used them as the base of one of the three beds I was building.
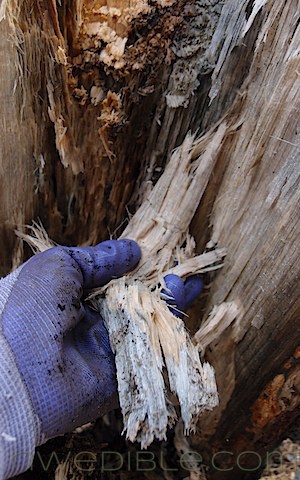
The well-rotted logs were, as the hugelkultur people promise, quite spongey in texture. I could easily peel strips of the interior of the wood away, like cellulose string cheese.
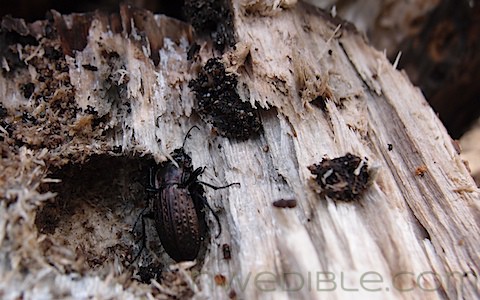
They were also home to an entire universe of critters.
I also gathered scrap wood, old but not yet rotten logs, some charcoal from the firepit, fresh kitchen scraps, half-finished compost and vermicompost, straw, litter from the chicken coop and branches and twigs that had fallen around my home.
Pile It On
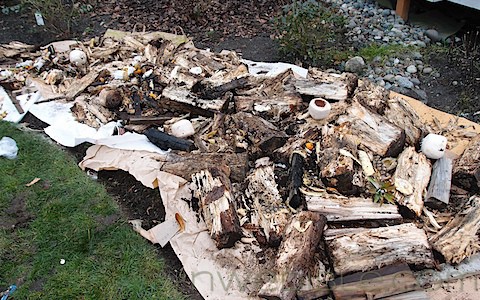
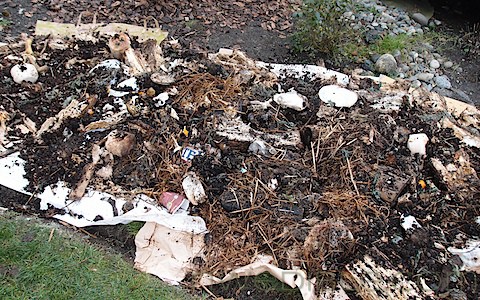
All my hugelkultur ingredients got layered over paper and cardboard. The logs and big chucks of stuff went down first, followed by kitchen scraps and compost in various stages.
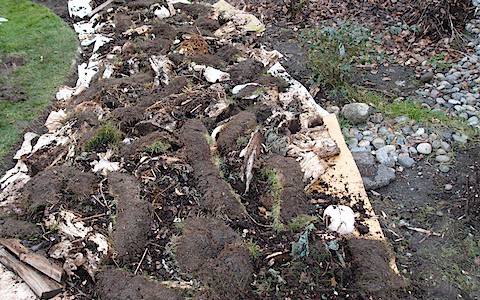
Extra strips of sod were tossed on upside down.
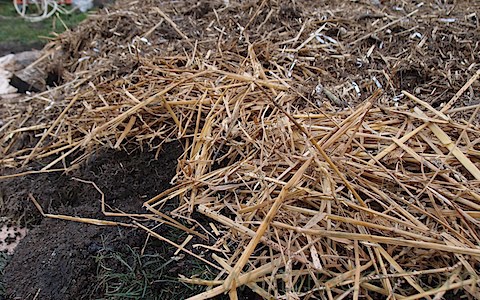
Fresh straw was piled on next and everything was tamped down thoroughly by Oliver.
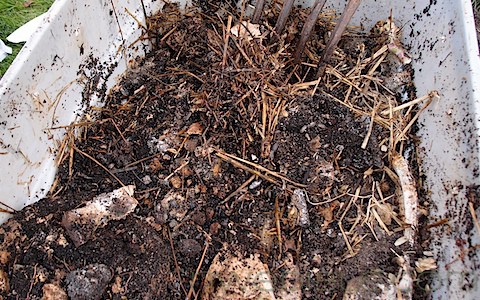
Then the more finished compost from the chicken coop went on. You can see the difference in texture between the fresh straw below and the chicken litter above.
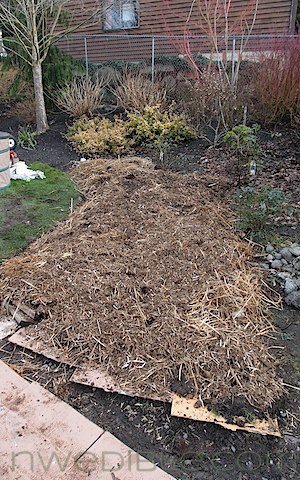
At this point, not a bad half-ass hugelkultur/lasagna bed.
Each of the three beds was created with slightly different materials, as I scrounged up what I had available. The base of the center bed was aged but solid logs instead of the rotten wood, for example.
Making It Look Good
Fellow blogger The Crunchy Chicken once commented on the less-than aesthetic characteristics of potentially lumpy hugelkultur beds. With her observation playing in my mind, I was determined to have pretty hugelkultur beds.
I find there are very few appearance issues in the garden that nice top dressing of mulch can’t fix.
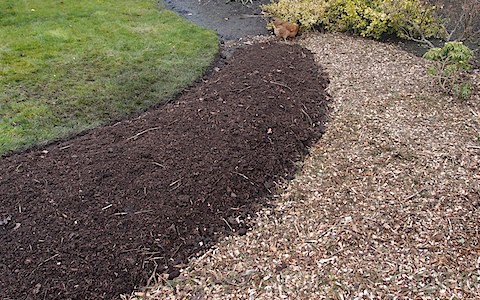
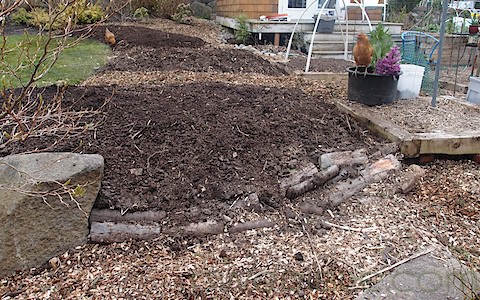
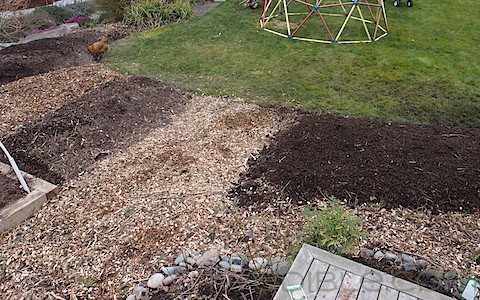
Once the mounded beds were top dressed with finished compost and the paths and surrounding areas were mulched with wood chips, the new beds looked downright respectable.
You can see the “bones” of this one, doing double-duty as a retaining wall of sorts.
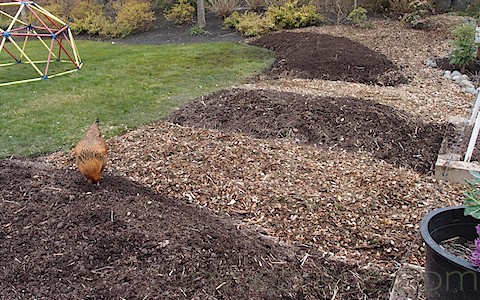
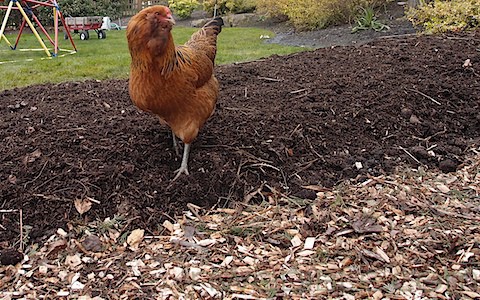
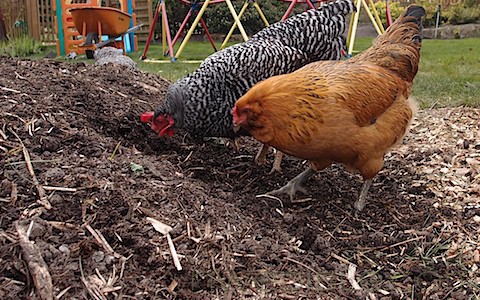
The chickens enjoy finding worms in the beds.
The little bastards are messing up my mulch! How do they always know I’ve just raked something smooth?
Before and After
Before (grass):
The Verdict
It’ll take a few seasons of growing before I can render a conclusion about these new beds, but I was pleasantly surpirsed to find that they are holding a soil temperature notably higher than my traditional raised beds. When I temped my soil a few weeks ago my uncovered traditional beds were all right around 42 degrees. Those under winter-long low tunnel plastic cloching were between 43-44.
The hugelkulture bed I built that gets the most sun was 47 degrees! The ones in more shade were 46 and 45 degrees, respectively. 42 degrees versus 47 degrees is a staggering difference in soil temp for early spring. To put it in context, the deep litter in the chicken coop, which is actively decomposing and is warmed by the bodies and motion of 7 spritely chickens was 48 degrees, only a degree warmer than the sunny hugelkulur bed.
It remains to be seen if this hopeful beginning will translate into increased yields and longer seasons, but I will report back.
Hugelkultur Resources
Want to know more about building your own hugelkultur bed, half-assed or otherwise? Check out these links, by people who seem like they actually know what they’re talking about when it comes to permaculture and hugelkultur.
Paul Wheaton’s Permaculture Article on Hugelkultur (Start here!)
Use Woody Waste as the Base of A Vegetable Bed – OregonLive.com / The Oregonian
The Art and Science of Making a Hugelkultur Bed – Permaculture.org.au
103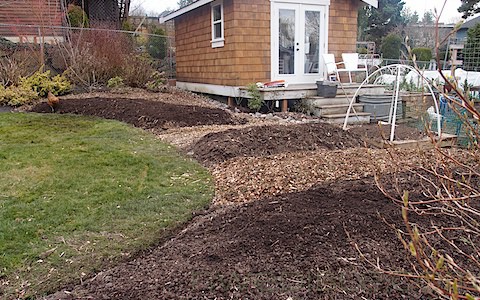


Looks good – can’t wait to see how it works for you 🙂
Did the chickens repay messing up your raking with some fresh fertilizer? 🙂
Dani – yes they poop and call it my “tip”. At least I think that’s what they’re clucking about. 😉
Good stuff, Erica! The new beds look great! Also, I can’t get over the picture of you working on the garden with your toddler strapped to your back.
Thanks Alison! Oliver isn’t as happy strapped on there as he was when he was a baby, but it’s safer for me to know where he is – exactly – when I’m swinging a mattock around!
Sweet! Love that you are admitting you dont know what you are doing!
Great info about soil temps, and makes me feel better about some of the random sh!t that has made it into my garden beds thus far. Hugelkultur, yeah. That was my plan.
Oh, yes! I’ve been gardening for 8 years, so long enough to know how much I *don’t* know.
I had to skip to the bottom without finishing the rest of the post just to thank you for the flour idea. I’m about to turn our 600 square feet of soil into neat little beds and rows, but last year it took me a week because I kept changing my mind halfway through. The flour trick will let me see it all laid out without having to move the dirt.
Been there! Yup, a few hours dusting flour around is far easier than a few hours moving soil around.
Wow ! Great Job, Erica ! I am impressed at the result. Please let us know how they fare….
Thanks Catherine, I’ll definitely let you know.
How do you get a kid strapped to your back? I’ve been wanting to do more gardening but having a kid strapped to my chest really makes it hard. (Not that it looks easy, per se, with a kid strapped to your back.)
No, you *have* to get ’em on your back if you want to get anything done. I’m wearing my Ergo here, which I swear by. I love, love, love mine. It’s 8 years old, on its 4th kid (2 were my friends) and still hanging in there, too. Other baby carriers allow you to keep the kid on your back, too, but the Ergo is easy to use for me because of the hardware and very comfortable, even up to 30 pounds. It can be worn in the front too. When he wasn’t big enough for the Ergo I wore him in the Moby, a stretchy wrap, and even did some back-carry positions with that, so you have a lot of options. Search youtube for videos of baby carrier back carry or getting baby into Ergo on back to see the ways it’s done. I will say after a few years of experience it takes me about 2 seconds, I can do it solo and I haven’t dropped a kid yet! Good luck!
Ok, I went out and got an Ergo carrier and I LOVE it. The only downside: baby boy slept so soundly I had to keep pinching his feet to make sure he was still breathing. He didn’t seem to like that.
Yay! I’m so happy you got your Ergo. Mine has saved my productivity-junkie sanity on more times than I can could count: baby happy on mom, mom happy getting *something* done!
I have no idea how to get anything done without my Ergo. I used to try to nurse my sleepy babies to sleep, but now I just nurse my son until he’s done EATING, then put him on my back and go do whatever I want. 🙂 It works great for all kinds of activity, from gardening to housework, etc., etc.
Oh, thank you so much for making this real to me! I have been considering this & what you’ve done looks just right for me even here in the rainforest.
Are you on the Oly. Peninsula? I know one of the advantages of hugelkultur is moisture retention and long term soil fertility – I imagine you don’t have an issue with soil moisture but rainforest soil is usually quite lean and depleted from the constant rain, right? And there’s probably a lot of spare logs lying around! Let me know how it works for you.
Thanks Erica, great post about how to put them together….especially like your idea about digging out the edge of the bed of grass!!! I had already completed my first Hugenkultur bed, but will use that for the next one!’
Thanks Mel – I think it keeps the edges a lot neater for not a lot of extra work.
gosh you don’t do hings by half measures – those beds are huge! They do seem to be all the rage don’t they? I suppose when soil temp is the issue you seem to have hit on a good thing. I look forward to seeing your progress.
“Don’t do things by half measures”…Yes, you have identified my greatest strength and, simultaneously, my greatest weakness! 😉
… I like your boots…
oh, and the new beds are awesome, too!
These high-rise teal Bogs were a Christmas gift from my mom to replace my busted-out Muck boots and I *adore* them. They are all messy and dirt caked now but before they had seen real garden time I wore them everywhere – to town, the store, on walks, etc. Very comfortable!
Yay! They look great! I did the same thing about 2 weeks ago with all the remaining bits of the four downed trees we had from the bad ice storm a couple of months ago, piles of maple leaves and compost. It’s not rotted wood, but it will be someday!
Thanks Jessica, they are currently growing my summer crops at a ferocious pace. Loving the Hk.
Huh, I just threw all my rotten logs into the shady perennial bed. I thought it made it look like a woodland. I’ll start putting them in the garden!
That’s more or less how I had my cache of rotten wood on site, too. Apparently it’s good to start with rotten stuff if you have it.
I am just about to disassemble our hugelkultur beds, but they have been great garden beds for the last couple of years.
Why are you breaking them down?
Ours were built on top of the ‘lawn’ with no real edging, or digging in to create a smoother edge. There were 3 beds, seperate from each other, with a lawnmower or wheelbarrow width between them. Initially they looked good (I was surprised how well they came up after my own half-assed attempt looked so dismal, but we had a permaculture teacher as our T/L on that project, he did a great job!), gave us extra growing space for cheap, and grew really well. But we found it hard to mow and trim in between them, and as they’ve started to break down, they look messy on the edges (I don’t think yours will have that problem, but you can always add extra mulch again for the ‘pretty’ factor you got!) These are in our front yard, and are no longer giving everyone the ‘permaculture is functional AND beautiful’ image I wanted to show neighbours and passers-by! The reason we did hugelkultur in the front yard was to condition the crappy soil there, and give us inexpensive garden beds, plus the permaculture teacher doing that project for our Permablitz was very keen to do them. The aim all along was to eventually put a fruit tree or two in that area. Now we are going to put raised beds in there, perhaps with a tree in the middle. This will be easier to keep looking neat, still provide edible growing space but convert back to ‘normal’ front yard if we ever need to sell. We will use all the good broken-down matter in the beds when we build them!
Oh, and by the way, we knew about the issues with hugelkultur & nitrogen, but we had loads of sheep poo to use in ours. The first growing season we had loads of pumpkins & other cucurbitae grow really well in them. Unfortunately, we had loads of sheep sorrel come up too… though it is edible apparently!
CRIKEY! has anyone told you today that they LUV U?!?!?!?!
I’m out in the San Juan’s and you’ve just provided me with a potential answer to a soil-building prayer. I have so much of this “waste” around for fill, you wouldn’t believe.
THANX for this xcellent post!
Thanks Sweetpea! So glad I could help solve your waste fill issue, and I’ll take the virtual hug any day!
I just started reading about hugelkultur this very morning and bam! Here’s beautiful photos of your finished beds.
I am dreaming about building a few of these beds in the new garden this summer. Hugelkutur might be a good alternative to trucked-in soil, which most people have to have in this area of sand with very little humus.
There are several vids around of hk beds being used in high-dessert type areas and the result is riparian plants that thrive. I would think the moisture holding capacity would be a huge advantage for gardeners with sandy soil.
Beautiful photos and excellent step-by-step. I did this in one of my raised beds recently and went back and forth on whether the nitrogen it would take to decompose the wood, etc, would negate the benefits of having all that organic material in the bed. In the end, I used way less wood and refuse than I originally planned. I haven’t read many of the permaculture books because, frankly, the permaculture “bible” is really pricey and I haven’t been able to justify it. Have you read anything about the nitrogen suck? I have a feeling this is going to occupy my brain until I get a clear answer! Thanks again for the GORGEOUS well-thought-out post (as always)!
Very encouraging! Last year I spent a lot of energy dragging the chopped up remains of a hawthorn tree to a burn pile. The tree was inside the fence and threatening to take over the garden, in the true coyote spirit of a healing plant. The pile of course was outside the fence. It was a lot of work and I never got finished. Ditto with the prunings of an overgrown red currant patch. Another thing on the agenda was building a few more lasagna beds on an area inside the deer fence that has not been developed yet. This winter I read Paul’s hugel article, BINGO! I can’t wait for that snow to finish melting……
i don’t understand these things. Where’s the DIRT? I mean I understand the logs rot eventually, but it looks like you just put a few inches of compost on top of that pile of wreckage. What is there to plant into?
Also don’t understand a kid, esp as old as Oscar, that will stay on your back while you do all that bending. Mine would never stand for more than 5 mins.
Didja know that half rotten wood is called ‘punk?’ True thing.
Ok, I think this is a lame question, but do you just plant in there right away? Or do you have to let it marinate for a while? I totally didn’t know this was a thing. Damn, I wish I could afford the permaculture classes! Thank you for leading the way. again. Oh, and that baby on your back, damn woman!!! Like child care, farming AND working out all in one! Have I said, “you rock” yet this month!?
Pretty indeed. And therefore I will offer a look to a lot scruffier looking version: http://millanpuutarhaopit.blogspot.com/2011/11/kohopenkki-osa-2-toteutettu.html
Unfortunately the blog is in Finnish.
1st pic: Our plot is located on an allotment field which is worked by a tractor twice a year as you can see from the surroundings. This year forward our plot will not be messed by the tractor so we can build hugel beds etc.
2nd pic: we dug a deepish trench because the dirt is partly clay and has had quite a lot of perennial weed roots.
3rd to 5th pic: all the scrap I was able to collect from the surroundings including some questionable stuff like rotten potatoes and discarded weeds. Under the scrap we put all the wood we were able to scavenge without looking suspicious
6th to 8th pic: we got few bags of leaf litter and twigs from the neighbor (was gonna take them to the landfill) and half-rotten garden litter from another neighbor.
9th pic: while we were fetching some fresh horse manure the frost came and the ground froze so I could not finish the hugel bed until a couple days later and forgot to take pictures.
I layered more leaf litter on the manure, and then covered it with the dirt from the trench. The final height was about half a meter so you can imagine how much stuff was put in there. The width from the center is roughly a meter, so the diameter is a bit over two meters
So that was last fall and I am eagerly waiting to get planting on it. However I need to wait a bit because it is still covered by a thick layer of snow… but I am hoping it will warm up quicker than the surroundings, which are ready to plant around the end of May. Yep, that’s Finland.
I was very skeptical at the thought of Hugelkultur beds in the back garden but yours are unobtrusive and look wonderful. Great news on the temperature readings as well!
It’s a great, lovely idea to add a “touch” to your garden. Will it be working for small area? This looks so nice but I only have 8 m2. And it seems like you have much bigger garden than I do.
It looks great and is a great way to do a garden. My only concern is termites. We actually had them gnawing on our house at one point so anything to do with rotting wood is not aloud at our house. That being said it looks like a great idea.
Do you think the cardboard is a vital step under the hk bed? Do you also have cardboard under all your wood chip mulched paths? Where do you get your boxes?
Really nice website, and nice hugelkultur beds. I’m nearly finished Gaia’s Garden by Toby Hemenway and got interested in using lightweight floorless coops (much taller than a typical chicken tractor) with the deep litter method as a way of building raised beds. Now I’m thinking hugelkultur is the easiest way to make it raised and that the deep litter method in this coop would be an easy way of covering it with good soil. All without shoveling much of anything. As I get into permaculture it seems like “mix it all together” is a maxim, but to do it intelligently. I made a pile of pine needles on the edge of the yard/woods for peeing and it hasn’t stunk at all. So I wonder if you can just lay down wood and straw, setup a toilet over it using plenty of carbon stuff, eventually more wood, soil, then deep litter chicken raising to make it ready for planting some sort of guild on. I’m thinking as the beginnings of a wild homestead, not a yard. But urban design is great too. Using cardboard to grow red worms for chicken feed has been running through my brain as well. Black soldier fly larvae composting. Maybe seed the hugelkultur with them during the toilet phase, making it safe much faster. Seeding wild areas with fungi, egg layers, and plants has got my interest now. As you make the garden, you can make the wilds richer as well. I feel different about things like knotweed now, that is simply nature healing human damage, beginning regenerative cycles that would mature over time if left alone or more quickly if we know what we’re doing.
Hi Ben, I kinda humorously resent Gaia’s Garden, because I read it after I had been doing things the “normal” way for 7 years and finished it thinking, “wow, I sure just wasted a whole lot of time and effort, didn’t I?” That said, hands down on of the best gardening systems books out there. Re: waste management – I recommend this post, which discusses using red worms to compost human waste: http://www.feralscholar.org/blog/index.php/2008/04/29/humanure-composting/
Yeah, this book has been shifting my entire perception of my place in the world. I had been working on the foundation of resonant belief systems for my entire life but permaculture brings it back down to underlying principles and designing based on context. Filled with golden nuggets that could quickly regenerate highly damaged ecosystems: fungi inoculation, hugelkultur, vermicomposting, versatile poultry raising, aquaculture. Daniel Quinn wrote something about how the movement of society with environmental policy is like sticks in a river, the water just rolls around it. I believe that, but with a guide to observation like permaculture I see culture as more of an emergent property. The channel the water of society runs through seems made of the physical habits we build. What we do with the organic material that flows in and around us, our food and waste. Thinking outside of dualistic analogies, which is such an ingrained habit. Watched a TED video with that neuroscience lady who had a stroke about how the left hemisphere is a linear processor and the right a parallel processor. This linked up with Frank Vertosick’s The Genius Within about living networks and intelligence. The left is designed to go I/Them, but we also have the expansive systems perspective of the right available to us. Use the this/that perspective as part of your toolkit to approach the ever-changing present moment, but not the whole thing. Healthy food seems like a nice facet of a wholistic approach towards emotional and spiritual balance as well. Breathing. Movement/postural awareness. So many people approaching the fundamentals again, how to be human. Sometimes it’s scary to be alive now when contemplating the future. But systems are amazing, and can change in unexpected ways. And now I know how to begin so it doesn’t look so bad anymore. Thanks for being a part of it, and emailing me about your reply. Ben
Ben, I so enjoyed reading what you wrote, and imagine you put lots of time into it, wondering, “will anyone every read this?” Just wanted to let you know you inspired me today, and have me thinking about how much permaculture technology needs human community to spread it throughout the land. Here in Wisconsin we’ve got great public radio call-in shows, which is where I heard somebody talking about it years ago.
Oh my god. I just read this (finally). You are too funny!!!
Just saying thanks for doing the photos and info, i don’t think it looks half-assed at all! very nice.
I’m going to try one!
This article is anything but “half-assed.” Excellent work. It inspires many ideas for those odd areas on my farm
I want to thank you for this post, too, as it provided me with the push I needed to go in this direction. I had read Gaia’s Garden, watched a few Sepp Holzer youtube videos, sat through Back to Eden, and tinkered around the Permies.com forums for weeks when I read your post. Suddenly it all came together and I thought, I can do that and I can do that way cheaper than I can build raised garden beds. This would allow me to build a giant garden immediately instead of expanding slowly over the years as we could throw more money at it.
I loved your advice to use flour to draw out the beds! I had decided to do 2 curved beds on either end and these were challenging to measure out. The flour definitely helped me to get it right before digging out the borders.
The project took months of hard labor not to mention traipsing around town looking for woody debris. I scored some nicely decomposing wood from a friend’s back yard, we took down one of own trees, I accepted wood from two neighbors’ trees that fell in a storm, and I found some giant pieces on the University of Illinois campus that they happily parted with as they were too big for their chippers.
http://www.flickr.com/photos/jaimeeandbrian/7826476722/lightbox/
I filled them in with kitchen scraps, yards and yards of leaves from our trees and our neighbors’ trees, and straw.
http://www.flickr.com/photos/jaimeeandbrian/8060227221/lightbox/
http://www.flickr.com/photos/jaimeeandbrian/8060228672/
Then the arduous task of coating them with 5″ of compost and 2″ of topsoil, which we got from our city’s landscape recycling center…. three loads of 5 yards each, hauled to the back yard in a wagon.
http://www.flickr.com/photos/jaimeeandbrian/8097680422/lightbox/
http://www.flickr.com/photos/jaimeeandbrian/8097680716/lightbox/
I topped them with cover crops of clover, rye grass, and field pea, but not much grew since we finished the last of the beds well after first frost. They’ve been hibernating and I can’t wait for spring to see how things grow!
http://www.flickr.com/photos/jaimeeandbrian/8487055182/lightbox/
Thanks again for helping me get going on this project!
Thanks for the great photos and info. I have been considering trying this style of gardening, but I am concerned about voles. Will they be more attracted to this? Did you see increasend vole activity?
I loved your article! Informative and funny…a delightful mix one doesn’t frequently find. I especially loved how “everything was tamped down thoroughly by Oliver.” He is precious. Thanks for taking the time to share this.
Haven’t researched this yet but seems like this type of garden would be a breeding ground for termites, carpenter ants, and mushrooms. I’m just saying. Although I never even heard of this method until today, so what do I know.
looks pretty good…… this is my 2nd year w/ a bed…… and even if it doesn’t work as advertised… i spend less time watering and can put a soaker hose along the top and that seems more effective…..
i love the concept and enjoy the newness of the theory….. and the added square area of the planting space makes a whole lot of sense….. so i made my pretty tall!!!
kd
“A hugelkultur bed is built with hunks of wood as it’s base – branches, logs, tree trunks, brush, etc. can all be used….” If you decide to build one of these (or two, like I did), use ROTTEN, ROTTING, or at least SOMEWHAT DEAD wood. DO NOT run out of wood while building your hugelkultur and, in desperation, assume that rounding out your lovely-if-it-weren’t-lopsided hugelkultur bed with a hunk of (very green) downed maple is anything but a VERY BAD idea. You may think that after you cover the (very green) mapel up with dirt and compost no one will know, but they will. You see, eventually that (very green) maple will send roots out and down and when cute baby maple leaves start poking their pretty little heads, and arms, and torsos through your dirt, you will have to explain your dumb move to everyone who thought you were crazy for building your hugelkulture in the first place. It won’t end there though–Oh, no!–, because once your crops have come out in October and before you plant your garlic and shallots, you will have to dig that (very green) maple and all of its roots and mess out of your hugelkultur in front of everyone who thought you were crazy in the first place. Then, you will have to find some VERY DEAD wood to replace it and cover it back up again. Just sayin’. Not ‘cuz it I did that or anything. (I did.) Just sayin’.
Natalie, I’m so glad I read your advice not to put green wood into hugelkultur beds, no matter how much it begs you to and promises to be dead and rot. I think you probably saved me, and for sure made me smile reading it.
Last year we bought this home on 2.5 acres and it’s covered in trees! Alot of them are horizontal… I’ve a HUGE pile of more-than-ready debris to start my own bed(s), but there are a couple issues I’m having.
One is location. I wanted to utilize the previous drainfield area – where I’m pretty sure they used those stupid foam peanuts – being careful not to dig, but to layer, as you wrote, leaving the grass right where it is. There’s no way I could dig down to remove all that… Will it wick upwards? Or will my super-duper organic machine be a match for it, do you think? It gets great sun AND will block my nosy neighbor who drives her golf cart right up next to my fence (20+ feet from the road!) to ogle my yard with her 3 yapping weiner dogs. (I adore weiner dogs, myself, as does my pitbull… eats one every chance she gets. Yes, she’s embarassing, but we love her. Which of us doesn’t get a craving?)
My second choice is the front yard, but my yard slants down from the road and I’m concerned about not being able to see anyone at my gate (hmm… which may not be an entirely bad thing). Plus there’s times when a garden just isn’t… picture perfect. Suppose my neighbors would forgive me?
We’ve pine, 3 different oak, dogwood, more pine, lot’s of old growth azalea woodiness, some trees I haven’t a clue about, and did I mention pine? Branches, needles & leaves, O My! and let’s not forget the weeds…. whoever said they “compete” with your grass? Ha! My grass says, “Come on in, there’s plenty of sand for everybody! Kumbaya!” Soil improvement is very high on my list of priorities.
My second issue is my chickens, The Ladies… The many, many piles are their favorite dining hot-spots. When they first get up in the mornings their first stop is their food bowl for all of 3 minutes (after I spend 1/2 hour lovingly chopping all their favorites into bite-size pieces, which no one bothered telling me wasn’t necessary until they were already spoiled and refuse anything that looks like it’s not covered in my sweat and reeking of utter adoration of her Highnesses), then stop by the bird feeder for a second quickie breakfast shared by the 15-20 birds I seem to be supporting (until I can get their food source plants going), and then they hit the piles of logs & debris, dining on termites, spiders, and other creepy things I normally run from, pecking and scratching for hours. Perhaps I just cut another pine or two down for them? I’ve plenty… and living here in the South, they’re all “bugg-y”. Not like what’s been lying around for the past who-knows-how-long… but I’ll be sure to have the written invitations to the termites ready beforehand.
I had heard nitrogen content was a concern when using pine, but at the rate these girls put out fertilizer, I’m pretty sure it’s covered (literally).
I’ve truly enjoyed your blog and have sat here way longer than I meant to! I can see you’re going to be yet another addiction to my life, already full of others… like watching my chickens run through the tall grass making all the bugs fly up, while the others jump up and down gorging themselves, til it’s the next ones turn. Or the squirrels who like to run to the very end of the hibiscus plants, making the branch bend over just short of the ground, eating the leaves… new meaning to “a balanced meal”…lol. I can’t even get mad at them, it’s too cute.
And so many others… You do seem more informative, somehow.
Thanks for listening, and I’m looking forward to your input!
New to this blog site today, found it referenced at Ace Of Spades just this morning. I have been reading it for two hours so obviously I am enjoying it. But Jeanette, I wish I were your neighbor. You made me roll with laughter, thank you. You and Erica have made my Saturday.
Trying to do some vegetable gardening; competing with deer, moles, rabbits, birds (snakes who come after the birds) and the occasional armadillo. Very challenging, but hopefully I can make a bigger impact this year. This bed idea is just what I needed. Thanks for the inspiration.
Thanks for the images of chickens frolicking in hugelkultur wood piles, Jeanette. Came to this page looking for a quick refresher before setting up a hk bed; got drawn in by all the well written, thoughtful comments like yours.
Ok, your chicken comment gave me a good laugh. For some reason chickens seem to have an innate sense of destruction where fresh raking is involved. Luckily I was able to use a tractor for my hugel beds since they are rather huge 5-6 feet tall by about 60 feet long. Behind my tractor is a steady stream of chickens and several chicken patties that have a death wish dancing in front of my loader bucket. I guess they don’t know I have no idea how to control the speed of the tractor :-).
Ah, you caught me just in time – we were going to build traditional raised beds in my mum’s back garden this spring, but I think we might do this instead! There’s so much brush and bits of wood and stumps lying around, I’m pretty sure we can get a couple beds’ worth in there. Only trouble is we have so much cedar around here, will have to avoid that.
I love the idea of hugelkultur! I am currently putting in a new raised garden bed and I was hoping to combine the raised bed made out of redwood fence boards with the half-ass hugelkultur method 😉 However, we have a vicious Shea Pine that sends up insane amounts of water thieving roots. Do you think the hugelkultur method would work on top of black plastic sheeting?
Nice! Looks good to me, would love to see how they produce, just starting one now of my own http://killingrytolivingry.com/index.php/entry/utah-urban-hugelkultur-first-step.